
Join 5000+ marketers that receive The Drip newsletter covering the most relevant topics in B2B marketing.
Welcome Studio Guide
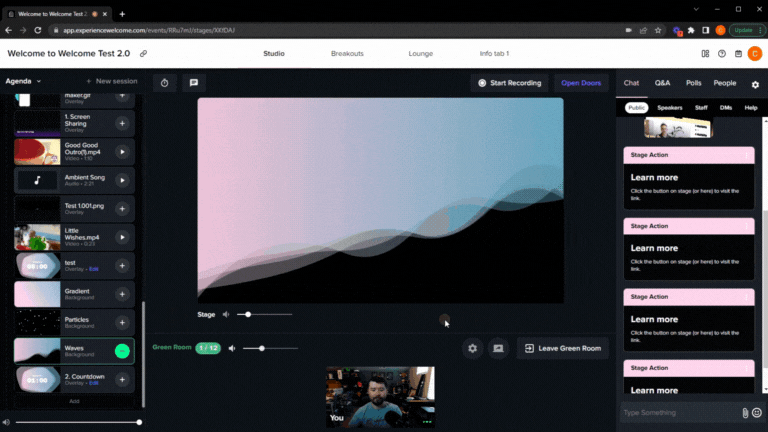
The Welcome Studio is the control center for your live event. Here you will spend most of your time managing asset and agenda to prepare for your event. Managing your speakers into and out of the green room. Managing extra features and most importantly push your great content to the stage for your audience to see.
Welcome Studio Basics
You have four core areas that have different functions you will be operating out of:
- Green Room on the bottom
- The Stage in the middle
- Stage Management Panel on the left
- Interaction Panel on the right
You can enter the Studio in two ways, from the Event Dashboard or directly from the event link.
Green Room

Think of the Green Room as the staging area for your speakers before they hit the Stage and present to the entire event. Anyone who needs to be on the Stage will need to enter the Green Room first.
Functions available
- Green Room Volume - This room has a volume slider independent of the Stage; this will allow you to hear what you need to hear and turn down what you don't.
- When Speakers go from the Green Room to the Stage this volume will default to mute; this occurs so that speakers on the Stage are not distracted by the Green Room chatter.
- A/V Cogwheel - allows you to change your camera and microphone devices.
- Join/Leave Green Room Button - How to enter/exit the Green Room.
- Only Producers/Staff can enter and exit on a whim. Speakers and attendees will need to be invited to join the Green Room.
- User Video Previews - When you hover your mouse over the different users in the Green Room, you will be presented with some options:
- Camera - This will allow you to turn the camera on and off for that user.
- Microphone - This will enable you to turn the microphone on and off for that user.
- X Button - Kicks the user out of the Green Room.
- The Green Room itself has a 12 "person" limit and the Stage has an 8 "person" limit
- Screen shares count as one person.
- A video playing on the Stage also counts as one person.
- Because of these limits, we recommend you only have people in the Green Room that need to be there
Screen Share/Present Button
You can find the Screen Share button to the left of the Join Green button. When you click the button you will receive a pop up to select your desktop, application, or Chrome tab. The screen share will fill a slot in your green room.
- If you also want to share audio you can check the "Share Audio" at the bottom left of the pop-up when sharing a Chrome tab or sharing a desktop for Windows devices.
- If sharing via a Mac device for the first time, you may need to alter your devices system preferences to allow Chrome access. Our Troubleshooting Permission Issues article explains how to do that in detail (at the bottom of the article).
Note that as a producer, you do not need to be in the Green Room to hear what's going on in the Green Room.
Inviting Users into the Green Room
Inviting users into the Green Room is very simple. Go to the People Tab at the top of the Interaction Panel on the right. Find the user, hover mouse over the profile image of the user, and an arrow will appear for you to click on. The user will receive an invite request and a Green Room prompt.
Join Green Room Prompt
When you join the green room a prompt will appear to verify both your camera and microphone settings. We also have a toggle to allow you to jump in with no camera.
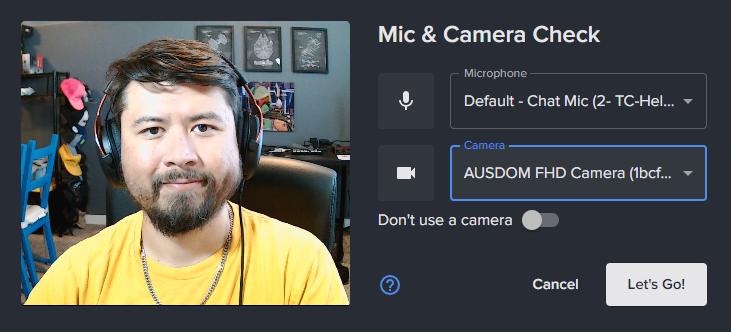
If users are having browser permissions, the prompt will state that you will need to alter your browser permission settings.

Stage
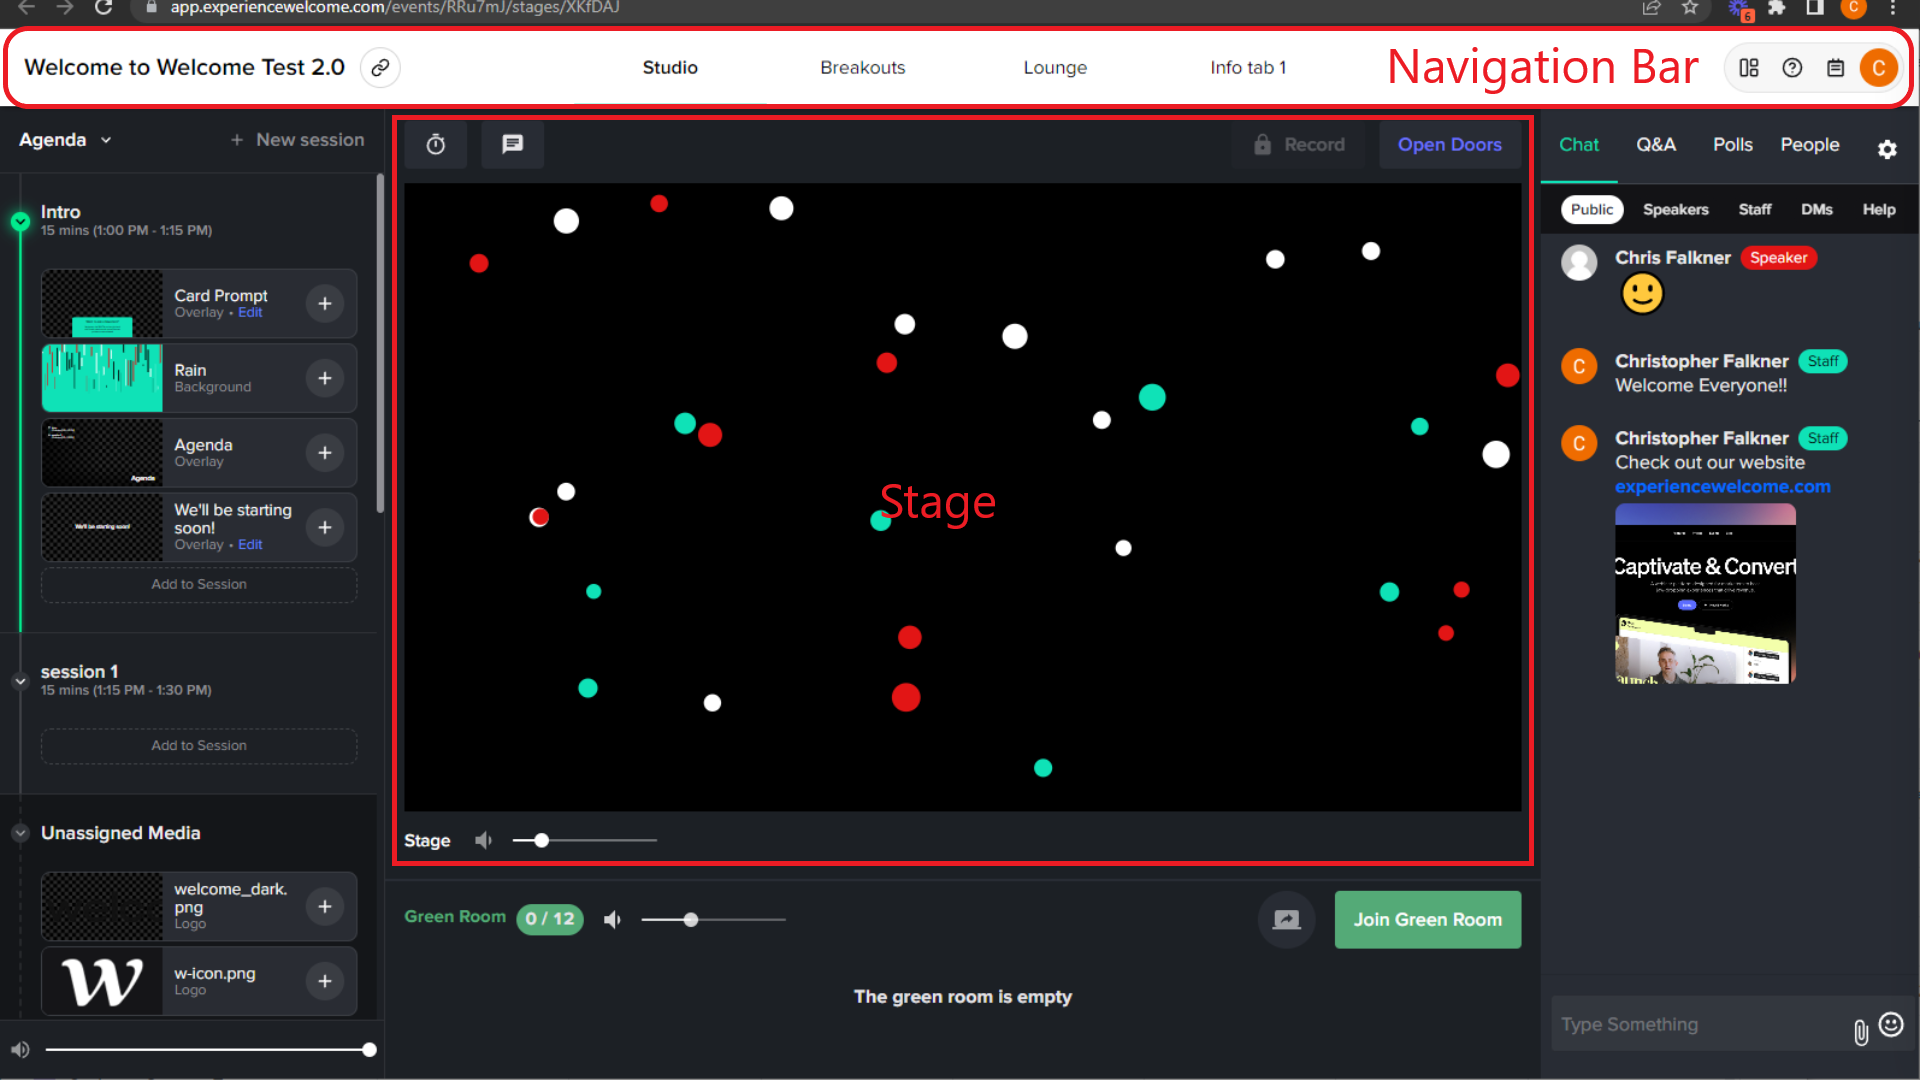
This is where the big show is displayed; it also happens to be where you will perform administrative tasks. You will be able to push speakers on and off the Stage. At the top the bar will allow you to navigate from the Studio to the different sections such as the breakouts and lounges.
Top Bar Navigation
- Room Navigation at the top will allow the user to move around from the control room, lounges, breakouts, and info tabs.
- For multi-stage events, the three stacked lines, aka the hamburger on the top left, will allow navigation from one Stage to another. Check out our Multi-Track Guide for specific information about it.
- Admin Section - Located in the far right corner will contain buttons and links.
- Event Board Button - Quick link to the Event Dashboard
- Knowledge Base - Quick link to producer help center
- Agenda - open and close what the agenda panel
- Profile Bubble
- Profile - Edit your user profile such as name and company info
- Preview as an Attendee - Puts you in the point of view of an attendee
- Contact Support - Quick link to the Welcome Support request form
- Sign out - Log out of your profile
Main Stage
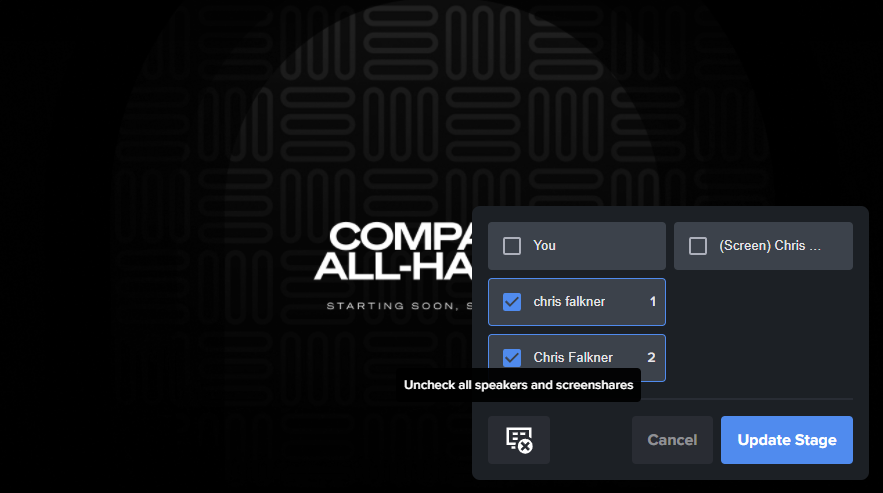
A stage management pop-up will show when you hover your mouse over the stage. To add/remove a speaker/s to and from the stage simply check the boxes for who you want on stage. How they will be organized on stage is notated by the number they are assigned to the right of the name. The stage is sorted from left to right and top to bottom. Screen shares are notated with "Screen" within parenthesis. You also have a uncheck all button at the bottom left. When you are ready to push the changes simply click "Update Stage" at the bottom right. Please note that depending on your screen/window size this pop-up may be resized and finding the correct person may be difficult. In this case, please make your window larger or adjust the zoom on your browser.
Stage Features
- Countdown timer - Visible to Producers and Speakers in the GR and on the Stage. A useful tool to ensure everyone is on the same page and managing the run of show.
- Announcements - A messaging system that will generate a pop-up at the top of the screen for all users.
- Streaming - Displays the status of any of the Streams that are being transmitted.
- When you open the door, streaming will activate. The stream will end when you close the door. Doors must be opened to stream out from Welcome.
- Record Button - Starts and stops the recording of the stage.
- Open/Close Door - This allows attendees to enter the event, independent of the listed start/end time. When Doors are open, attendees can come in. When doors are closed, they cannot.
- When closing doors you will be given a prompt asking if you want to kick attendees out of the event or not.
- Producers and Speakers can come into the event at any time even if the doors are closed.
- Stage Volume - Let's you alter the stage volume independent of the Green Room volume.
Stage Management Panel
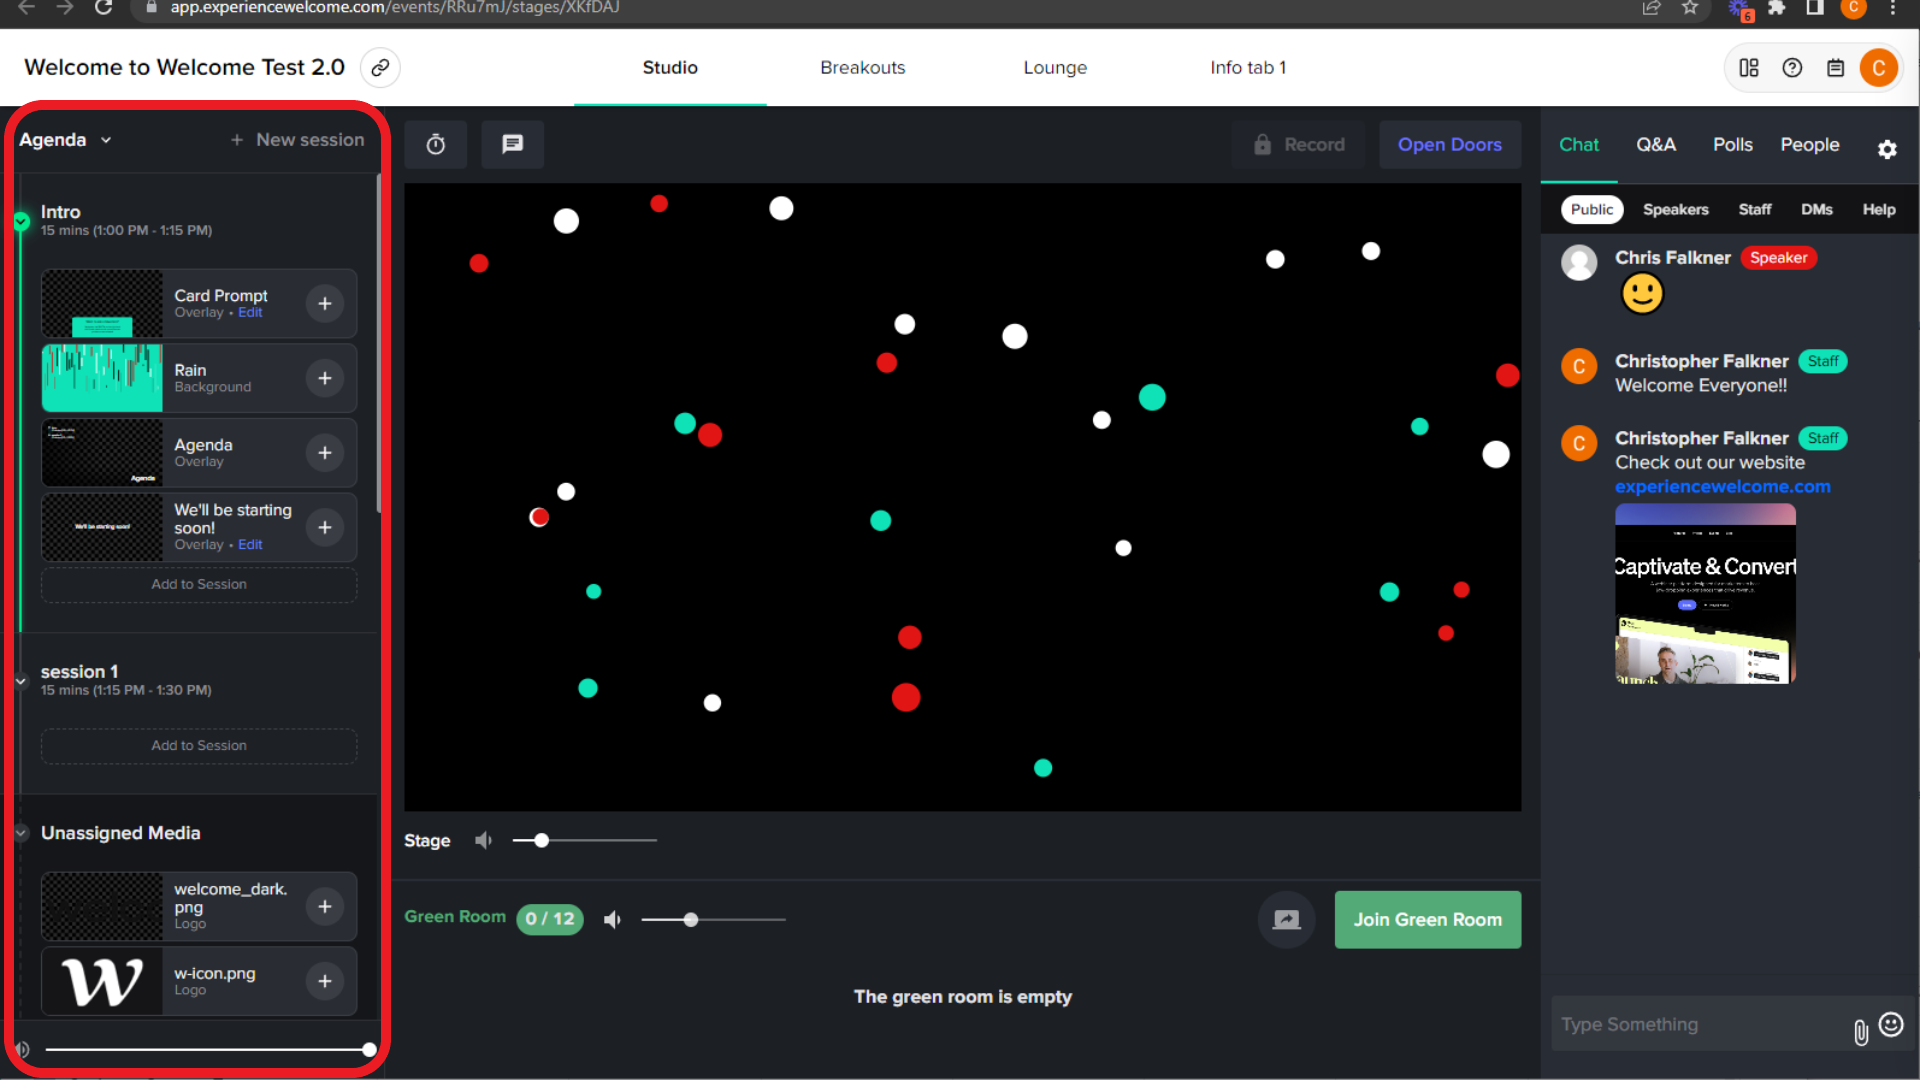
This is the panel where you will be managing your assets along with where you will be able to push them to the live Stage. You will be able to play videos, audio and set your images such as backgrounds and overlays.
Before we get into the types of assets you can manage in this panel. We have 2 modes you can operate out of. You will see a drop down at the top left allowing you to toggle between our Legacy and Agenda Builder.
- Legacy is our simplified panel that will allow you to add assets and push them to stage. Assets are organized by asset type.
- Agenda Builder is our advanced panel that will allow you to not only add assets but also help you organize your event agenda session to session with some advanced features.
Types of assets you can use:
- Videos and Audio - You will be able to start and stop these media files. You can use the media volume control to adjust the volume for these pieces of media.
- Videos need to be MP4, and 720p resolution is recommended for video. Please ensure your videos meet the 1GB limit or reach out to support@experiencewelcome.com to discuss alternatives.
- Greater resolutions will be downscaled.
- Note that there is an uploading and processing time if you are adding videos during a live event.
- Audio files need to be MP3 files.
- Overlays - transparent or opaque image files that sit at the top layer of the stage.
- AKA they will go "over" videos, background images, and speakers.
- Logos - Small image that appears at bottom right-hand corner.
- Backgrounds- static images that sit behind everything. GIFs can work also.
- Event assets can be uploaded from within the Event Dashboard as well.
- Stage Kit - built in asset generator that can help you create the above.
Interaction Panel
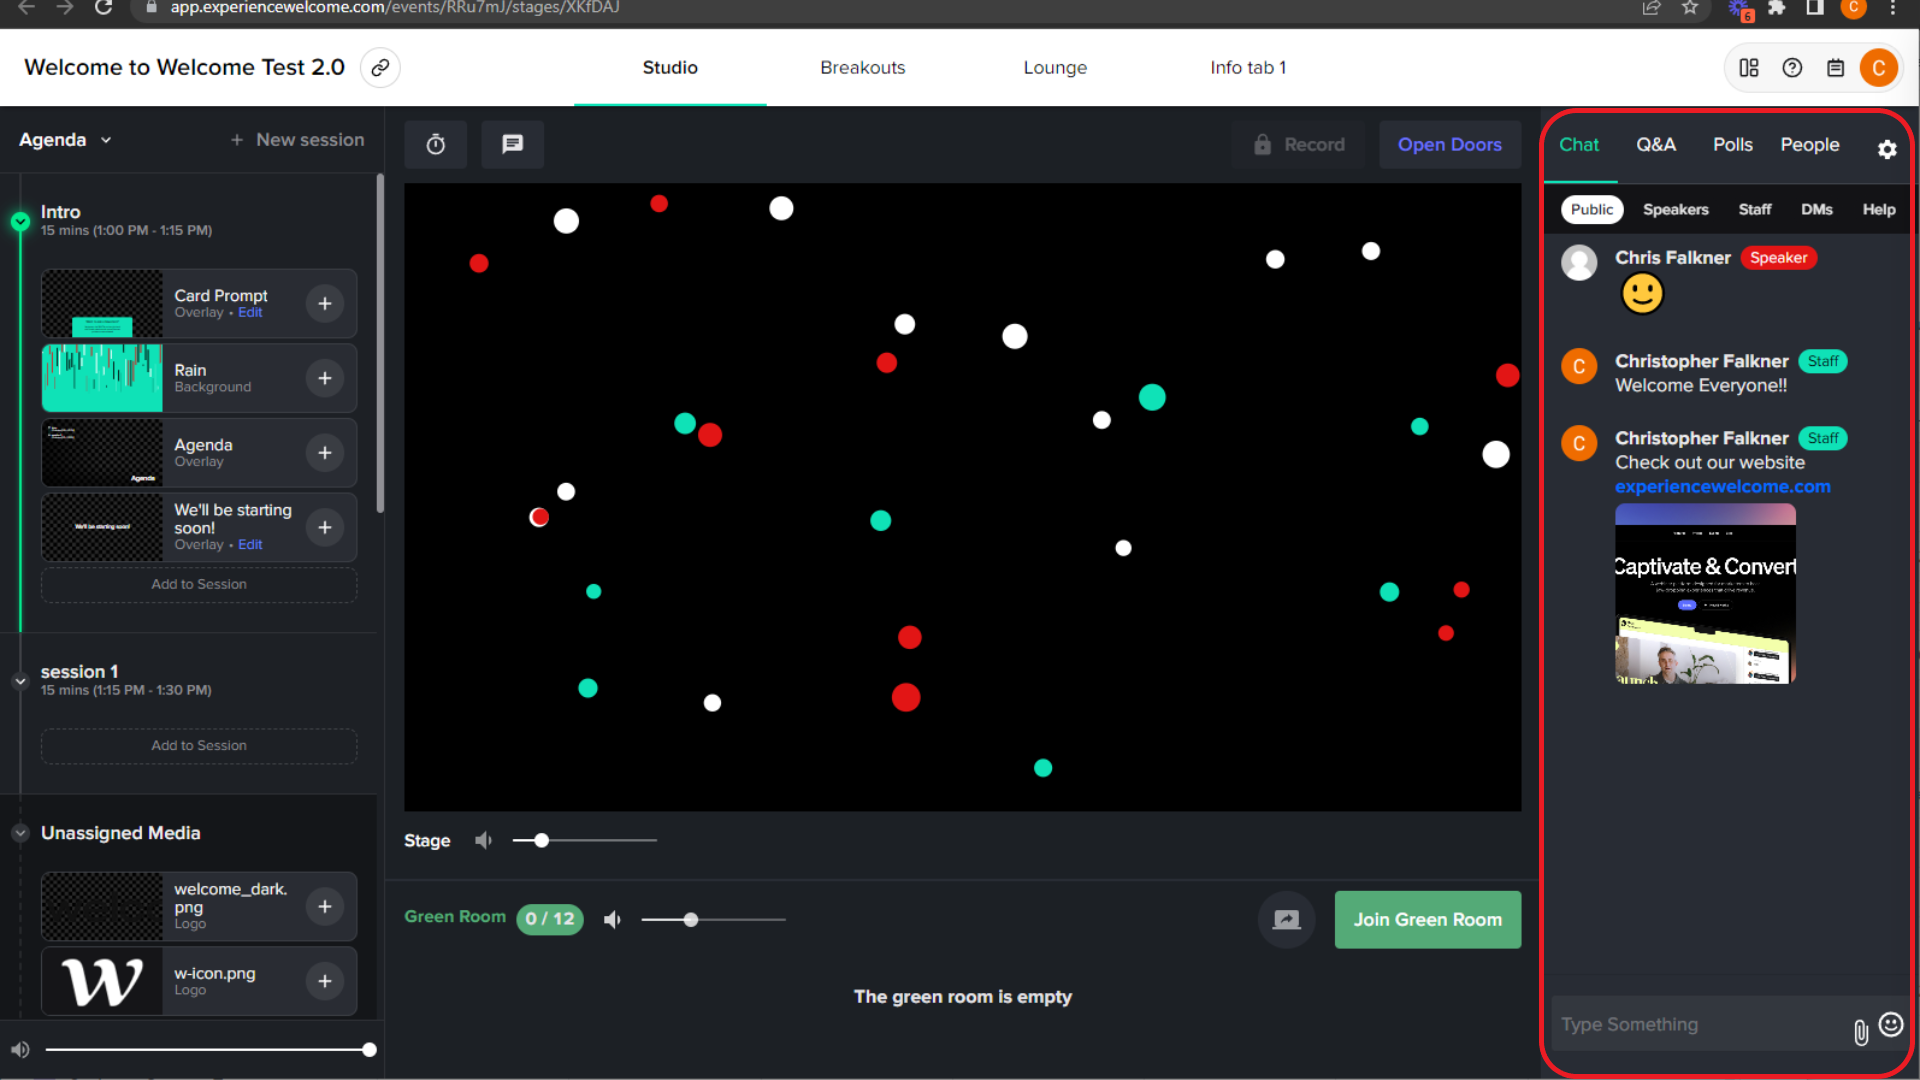
Besides speaking on the stage and to those sitting in the green room, this is your primary way to speak and engage people in your event. You will have access to multiple chat rooms and attendee engagement features.
Chat
Chat is the primary non-verbal way of communicating with users. We have a few different channels available and some fancy features. Checkout our CHAT GUIDE for a dive in to the features.
- Public - Primary chat for attendees; it is usable by all users in the event.
- Producers can delete individual chats.
- Speakers - Chat can be seen by producers and speakers. Attendees that are invited and in the Green Room will be able to see this chat. If an attendee leaves the Green Room, they will no longer be able to see the Green Room chat.
- Staff - Private chat just for Producers.
- DMs - Direct messaging to specific people.
- Help - Technical help channel for attendees. Help chats are only visible to Producers.
Q&A
Attendee engagement feature that allows attendees to post questions for the speakers. Questions posted are then voted on by other attendees. As a Producer, you will be able to push the question to the Stage to be visible. You can also send an invite to the attendee who submitted the questions have them come on Stage, live.
Polls
Polling is an attendee engagement feature that will allow you to post questions for your attendees to answer and stir up conversation with them. Our polling feature will allow you to put polls up on the Stage with your speakers.
People
The People Tab allows you to scroll through all the different users in the event. Users are organized by event titles making it easier to find speakers to invite into the Green Room. You also have some actions that are possible in this tab:
- Search - Search for users by name or email
- Green Room Invite - Send a user a invitation into the Green Room
- Direct Message - Start a private conversation with a user
- Video Call - Start a private 1:1 call with a user
- Ban user - Banning a user will kick them out of the event
- To un-ban a user, you will need to reach out to Welcome Support
Media
- Hover Previews - Displays a larger view of stage media when hovering over the add button
Stage
- Stage Captioning - Toggle Closed Captions
- Name Tags - Automatically show the names, role, and company of speakers as they are pushed on stage
- Name tags auto dismiss - All speakers name tags will disappear automatically after 10 seconds
- Sticky name tag for one speaker - Prevent name tags from auto-dismissing when one speaker is on stage
- Overlay fade transitions - Transition between overlays with a fade effect
- Hide speaker bubbles during screen sharing
Chat
- Public Chat - Toggles feature on/off
- Clear - Red button that will clear out the Public Chat; this will remove it from the data and is irrevocable
- Slow Mode - Prevents users from spamming the chat. This forces the user to wait 10 seconds before they can post again
Q&A
- Q&A - Enable feature, up to 50 questions at a time. Attendees are limited to 10 at a time
- Moderate Questions - Toggles on/off moderation of questions before going public
- Anonymous Q&A - Attendee's Choice - Attendees can choose to keep their names anonymous when submitting questions
- Anonymous Q&A - All - All questions submitted will be anonymous
- Raise Hand - Enable feature to allow attendees to ask to come into Green Room
Polls
- Hide vote count on polls - Only percentage results will be displayed for polls
People - People and Polls preferences will not be applied to staff
- Peoples list - Hide the people list from attendees
- Hide People count - hide total count from attendees
- Direct Messages Toggle
- 1:1 Video Calling Toggle
Still need help?
If none of the solutions work above and you're still experiencing issues, feel free to contact support@experiencewelcome.com or click Help at the bottom right corner of the screen.
Trending Posts
Welcome's Next Evolution: Webinars and Content at ScaleABM and Demand Generation: A match made in heaven?The Ultimate Guide on How to Integrate Organic and Paid Marketing Strategies
Stand Out By Staying In: 5 Ways To Use Brand Marketing Right Now
8 Creative Ways to Repurpose Your Webinar Content
Growth Marketing vs Demand Generation
How to Drive Qualified Pipeline and Enable Sales After Your Webinar Wraps
Loved and Trusted


