
Join 5000+ marketers that receive The Drip newsletter covering the most relevant topics in B2B marketing.
Multi-Track Guide
A multi-track event will allow you to have multiple concurrent stages and areas under a single landing page. This guide is intended to show you how to create, manage, and navigate multi-track events.
Areas of Change
Registration Page
The registration page will transform from a single-stage view to a multi-stage view. You'll be able to scroll down to see the different stages, along with their agendas. This allows your attendees to have a better view of the entire event from a glance.
Event Dashboard
In your Event Dashboard, you will have a new section added to the left-side navigational panel that will allow you to add, delete, and manage each stage you have added.
Control Room
In your Control Room, you will have a new navigation panel at the top left corner in the shape of a hamburger or 3 stacked lines. This panel will allow you to change between the stages. Attendees will see this navigation panel on their end as well.

How to Create a Multi-Track Event
- Create a new event in your organizational Dashboard.
- Once created, scroll to the bottom of your navigational panel on the left and click "Turn into multi-track event". Note that you can only do this if your event's start time is in the future.
- Fill out the fields for the name of the 2nd stage you want to create and click "Turn on Multi-Track". You will be able to add more stages to the navigation panel after it has been created.
- Congrats your event is now a multi-track event and now you will see new options in your navigational panel of the Event Dashboard.
Managing your Multi-Track Event
In the newly created multi-track event you will now see the two stages that have been created in the navigation panel on the left. One is the main stage which inherits details from your Event Details. Your new stage will not inherit these details and is a blank slate for you to customize.
Each stage is self-contained and will have its own unique details, agenda, stage media, and streaming settings. Let's dive into each of the sections and explore what you can do.
Stage Details
You have three specific sections you can modify:
Details
- Event Name - The name of the event is limited to 60 characters.
- Event Description - This is the main body of text on the event registration page. Be aware of 300 character limit, if you go beyond the limit it will interfere with the scaling of your registration page image.
- Start and End Time - Sets the time of the event. When setting the start time you are unable to set it to a time in the past or have the end time finish before the start time.
- Time Zone - This will set the default time zone for your event.
- Brand Details - after your Event is over, you can choose to direct Attendees to a custom URL of your choosing. In the Brand Details section, under the Cover Image, you will see an option to enter a Post Event Marketing URL. The Attendee will be redirected there after your Event ends.
Customization
Spaces
Allows editing the names of the "Spaces" that your users will be participating in.
- Auditorium - Name of the main stage.
- Breakouts - Name of the private/curated rooms that require invites by the producers.
- Lounges - Name of the casual rooms attendees can jump in and out at their leisure.
Primary/Secondary Info Tabs
- This creates additional tabs in the event that are linked to website URLs that are then embedded into the event.
- The website you are linking to will need "iframing" for it to work. Most large public websites will not have this option on so you won't be able to link them. You can use https://iframetester.com/ to check if your website is compatible.
- When adding the URL please do not include HTTPS:// as it's already included. Adding this a second time will cause the page to not load.
- Check out our Info Tab Guide for complete details.
Brand Details
Images
- Logo - Appears at the top left corner of the registration page.
- Icon - Appears at the top left corner of the event page. Please note that this is not visible in the producer's view.
- Cover Image - Primary image that will appear next to your event/stage description for your event landing pages.
Agenda
You will be able to build an agenda via the Agenda Builder within the Welcome Studio. The agenda can be viewable on both the landing page and within the event. The agenda will showcase time ranges, session name, and a brief description of what the session will be. Please check out our Agenda Guide for specific details.
Stage Media
This is the area where you will upload your media assets, it is the ideal place to upload them in bulk. You are still be able to upload assets via the Control Room if needed.
Files are sorted alphabetically from top to bottom:
- Background Images - These appear behind your speakers and slides, or as interstitials in between different sessions. 16:9 1920x1080; PNG, JPEG, GIF, SVG
- Overlay Images - You can put overlays on stage to provide supplemental information and branding. 16:9 1920x1080; PNG, GIF, SVG
- Logos - These appear unobtrusively in the bottom right corner of the stage. Keep these to 200x200, PNG
- Videos - Videos can be interspersed with live feeds of your speakers. 1GB limit, 16:9 ratio, 720p, MP4
- Music- Long audio files (greater than 8 seconds) to be played during your event. MP3 only
- Sound Effects - Short audio files (less than 8 seconds) to be played during your event. MP3 only
Adding and Removing Stages
Adding a stage can be quickly done by clicking the + sign to the right of Stages in the navigational panel. This will generate a new stage below the others you have.
Removing a stage can be done within the "Stage Details" section of the stage at the very bottom. Simply click the red "Delete Stage" button and confirm the decision in the pop-up. Please note that you cannot delete the main stage. Also, any deleted stages are not retrievable.
Navigating your Multi-Track Event
Now that you have generated your stages let's go over how to navigate to them in the Control Panel. To get there you can click the "Control Room" button at the top left. Click on it will generate a drop-down selection of your different stages. Select one to go to that stage's Control Room.
Multi-Track Event Navigation Panel
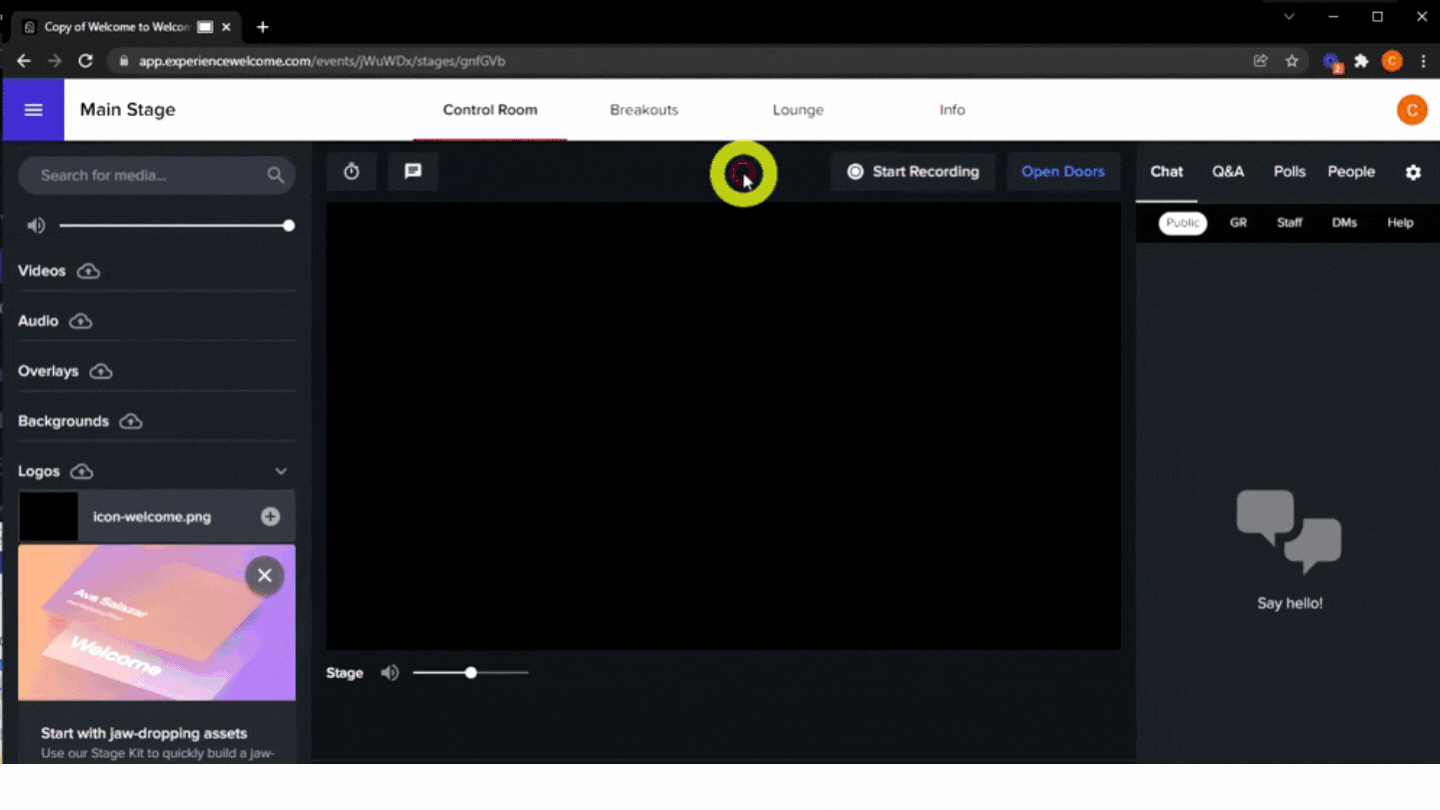
Navigating the stages in the Control room behaves the same as it would for your speakers and attendees. At the top top left corner in the shape of a hamburger or three stacked lines is the button to open up the navigation panel (please see image below for an example). Within that panel you will see stages that are available. If the doors are closed for a stage it will state "Currently Closed". Attendees will not be able to go to closed stages but, speakers and producer will be able to.

Still need help?
If none of the solutions work above and you're still experiencing issues, feel free to contact support@experiencewelcome.com or click Help at the bottom right corner of the screen.
To learn more about our webinar and virtual event features, click here: https://www.experiencewelcome.com/features
Trending Posts
Welcome's Next Evolution: Webinars and Content at ScaleABM and Demand Generation: A match made in heaven?The Ultimate Guide on How to Integrate Organic and Paid Marketing Strategies
Stand Out By Staying In: 5 Ways To Use Brand Marketing Right Now
8 Creative Ways to Repurpose Your Webinar Content
Growth Marketing vs Demand Generation
How to Drive Qualified Pipeline and Enable Sales After Your Webinar Wraps
Loved and Trusted


