Marketo Integration Documentation
Overview
Welcome’s Marketo integration enables our customers to use the actions a Lead takes in Welcome to inform the next step of that Lead's buyer’s journey.
The integration is streamlined to require minimal configuration. It makes it so your Marketo Program Members need only click a link to get into an event, without going through registration. It sends back clear, easy-to-interpret signals of attendee sentiment, in real-time, for follow-up action.
Some examples of things you can do with the Welcome integration are:
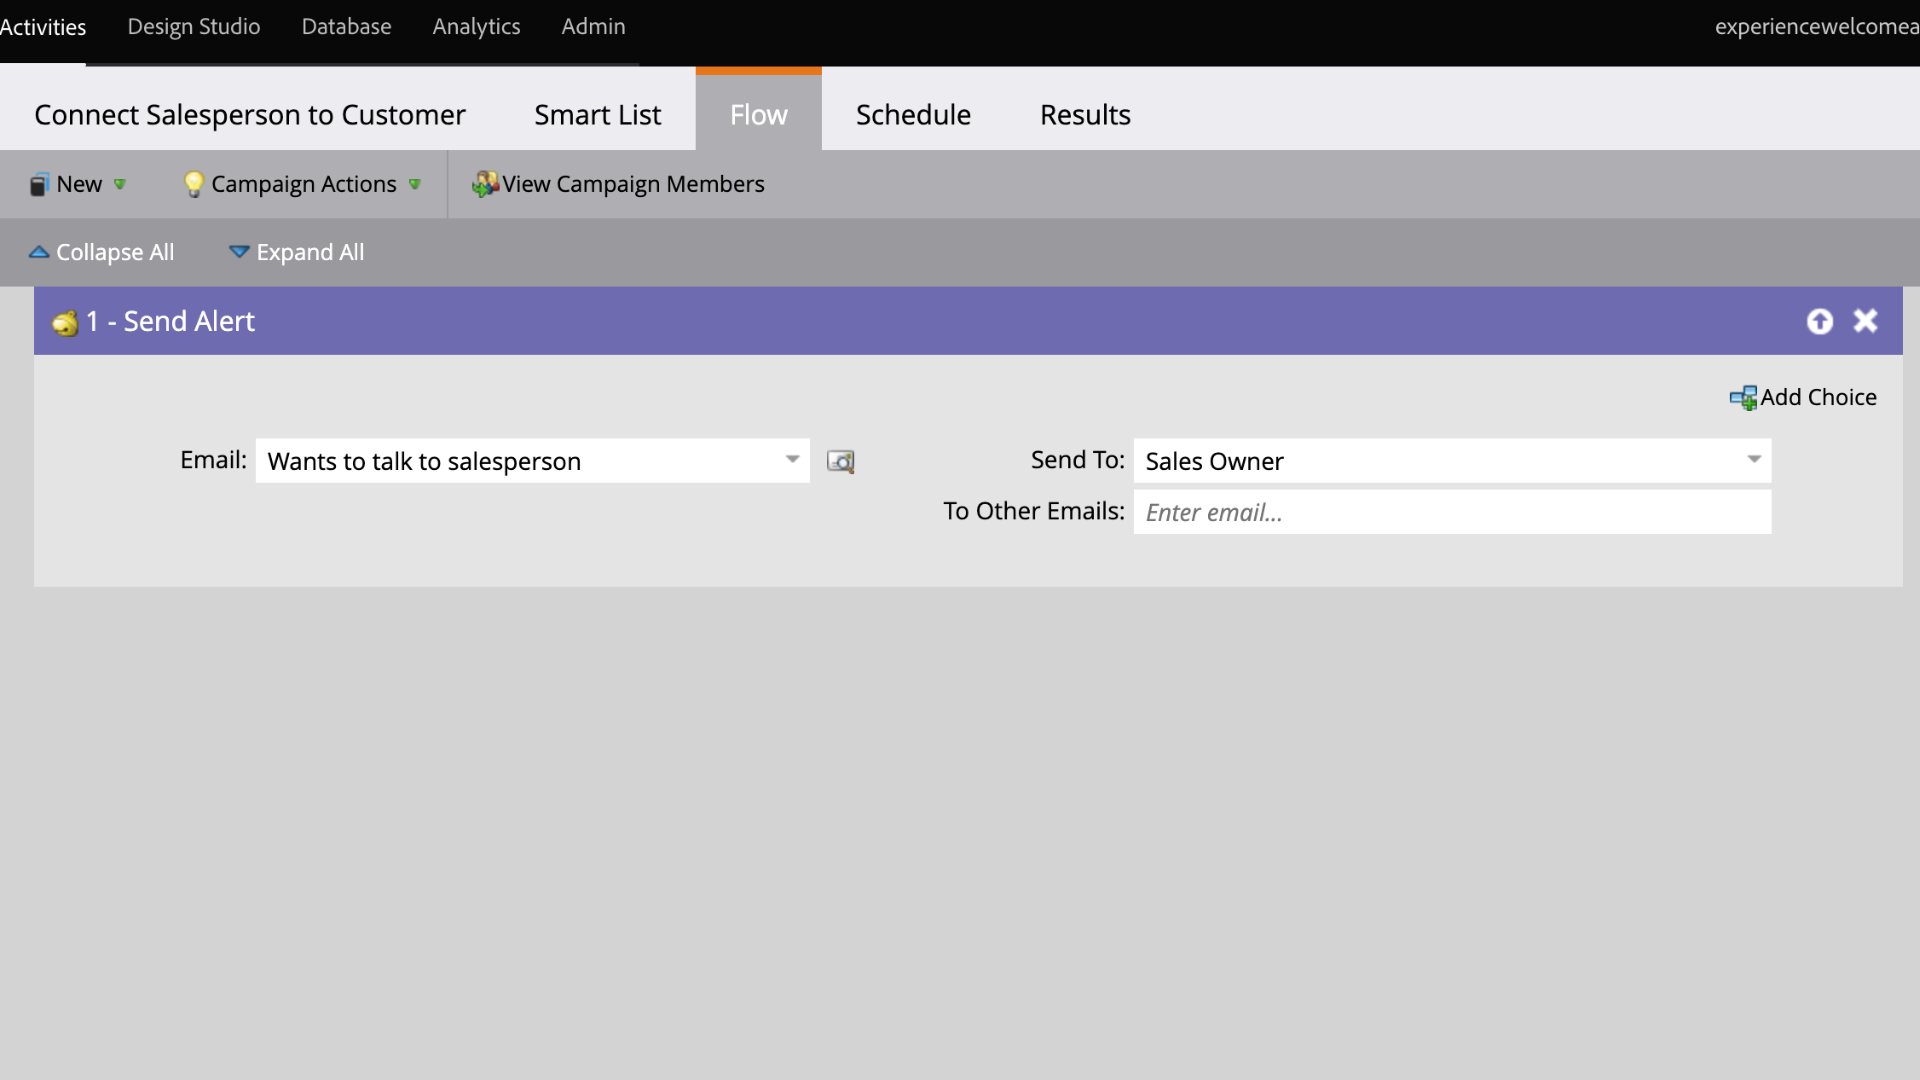
Signal the Sales Owner in real-time when their prospect engages with a “Do you want to talk to a Salesperson?” Poll

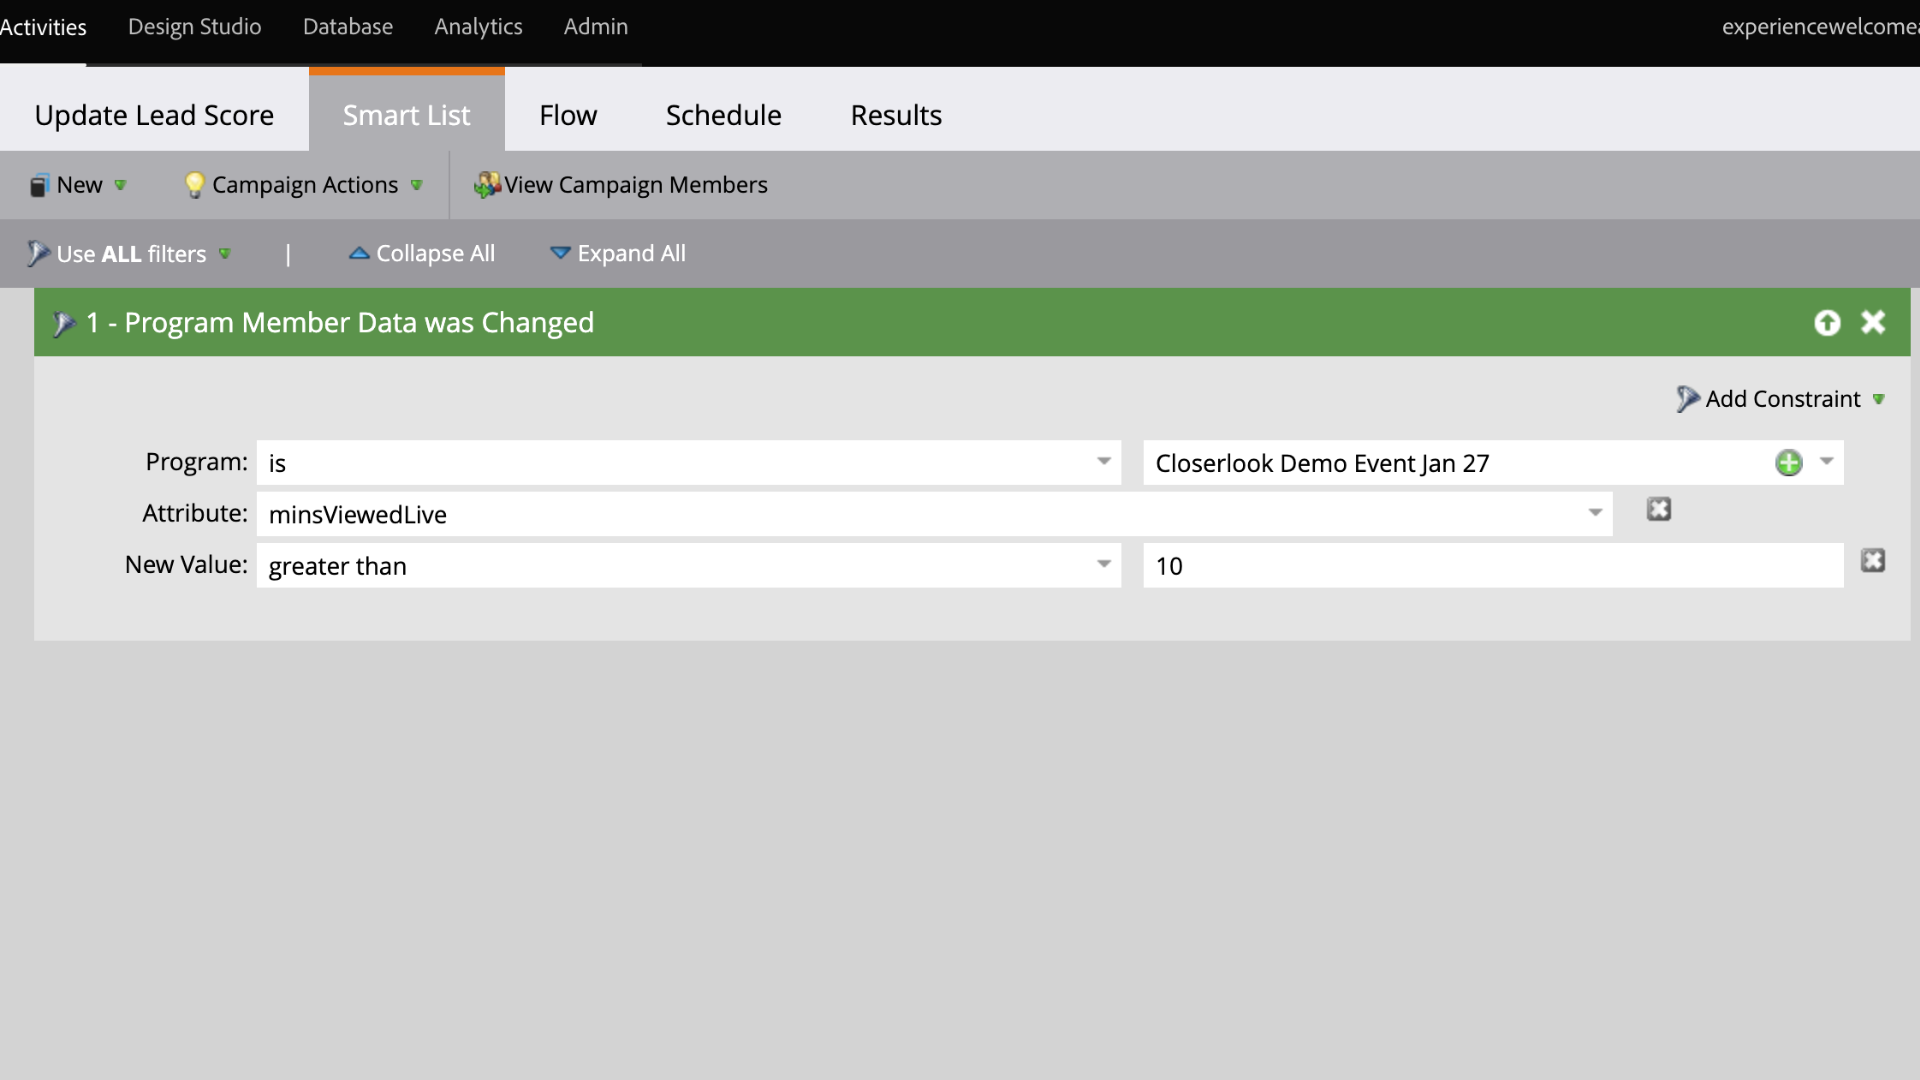
Increase Lead score for any lead who has spent more than 10 minutes at a specific Webinar.
Create new Leads and Program Members for people who attend your webinars with their custom registration fields

Setup – Connecting Welcome to your Marketo Instance
- Log in to your Welcome Producer Account at app.experiencewelcome.com
- Navigate to Integrations at the left side of the screen

- Click configure and click New Authentication in the popup that comes up
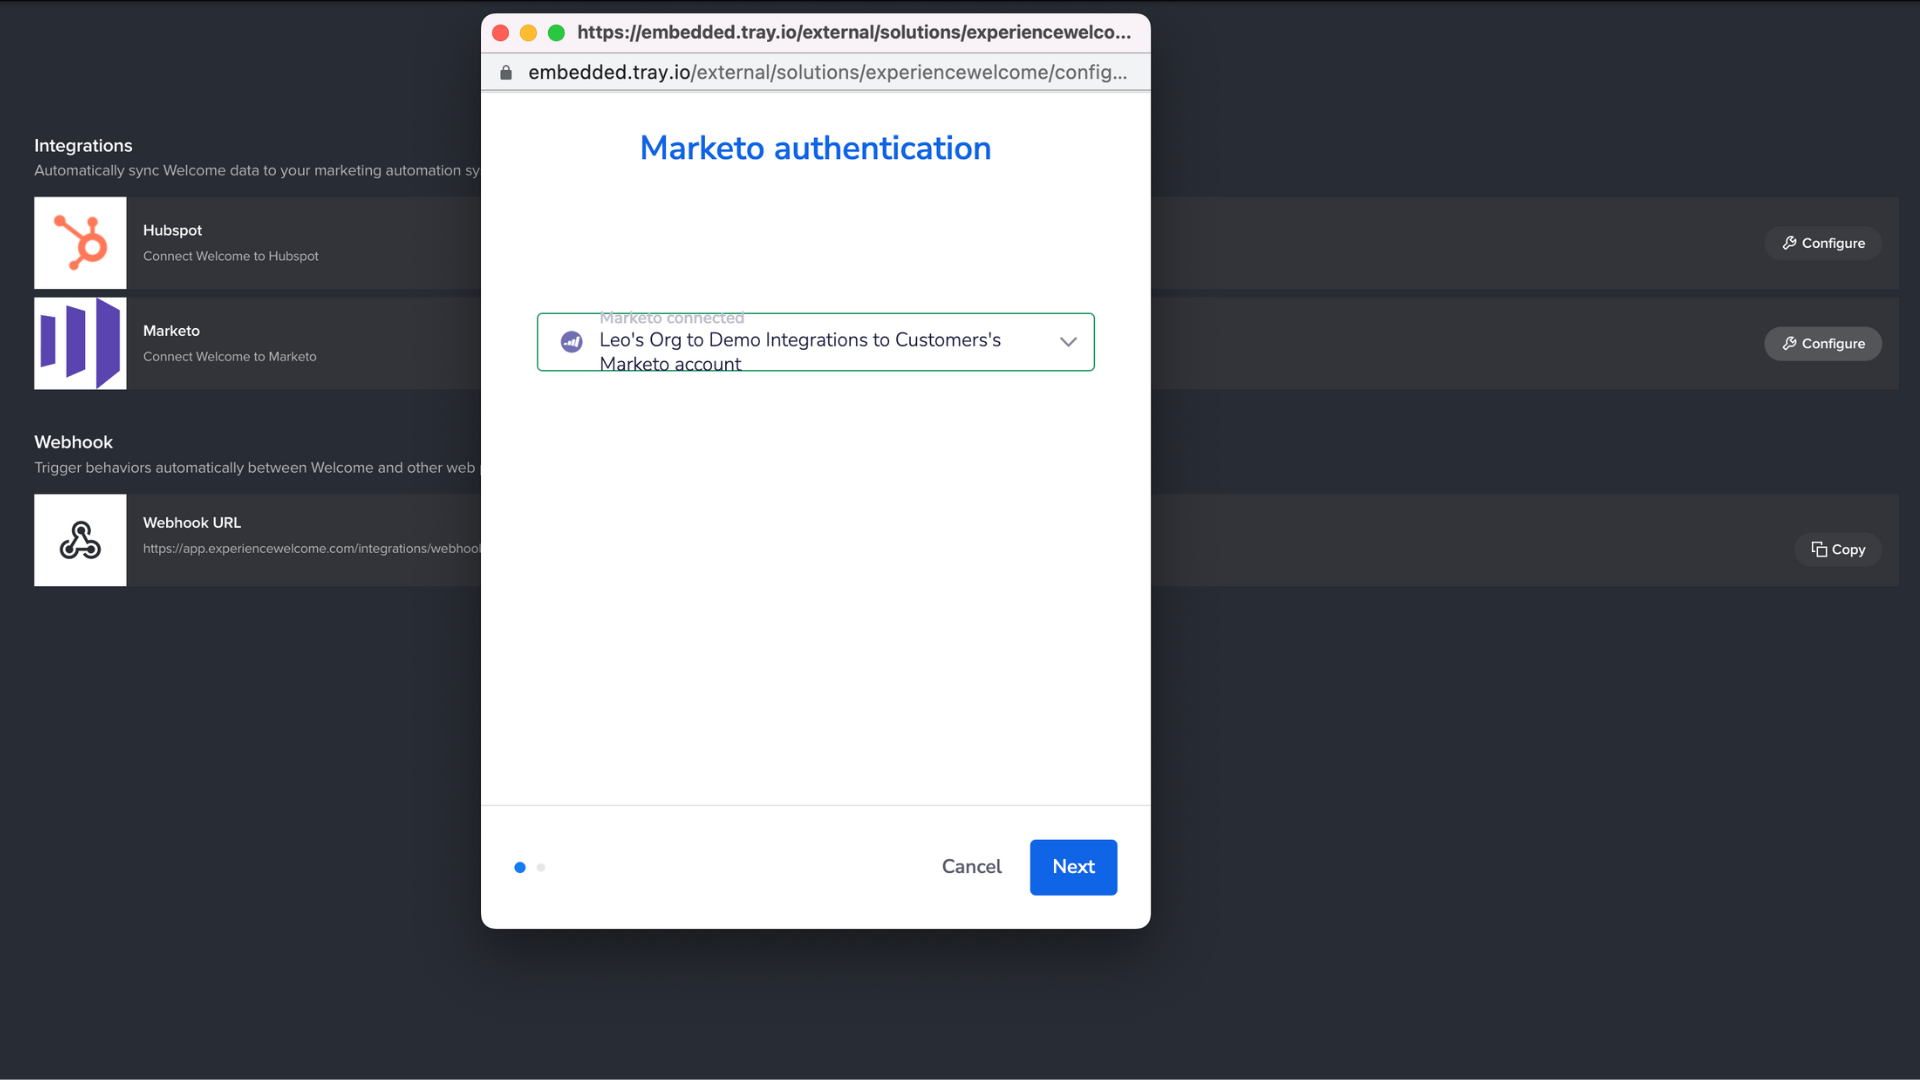
- Log in to your Marketo Instance in the window that pops up.
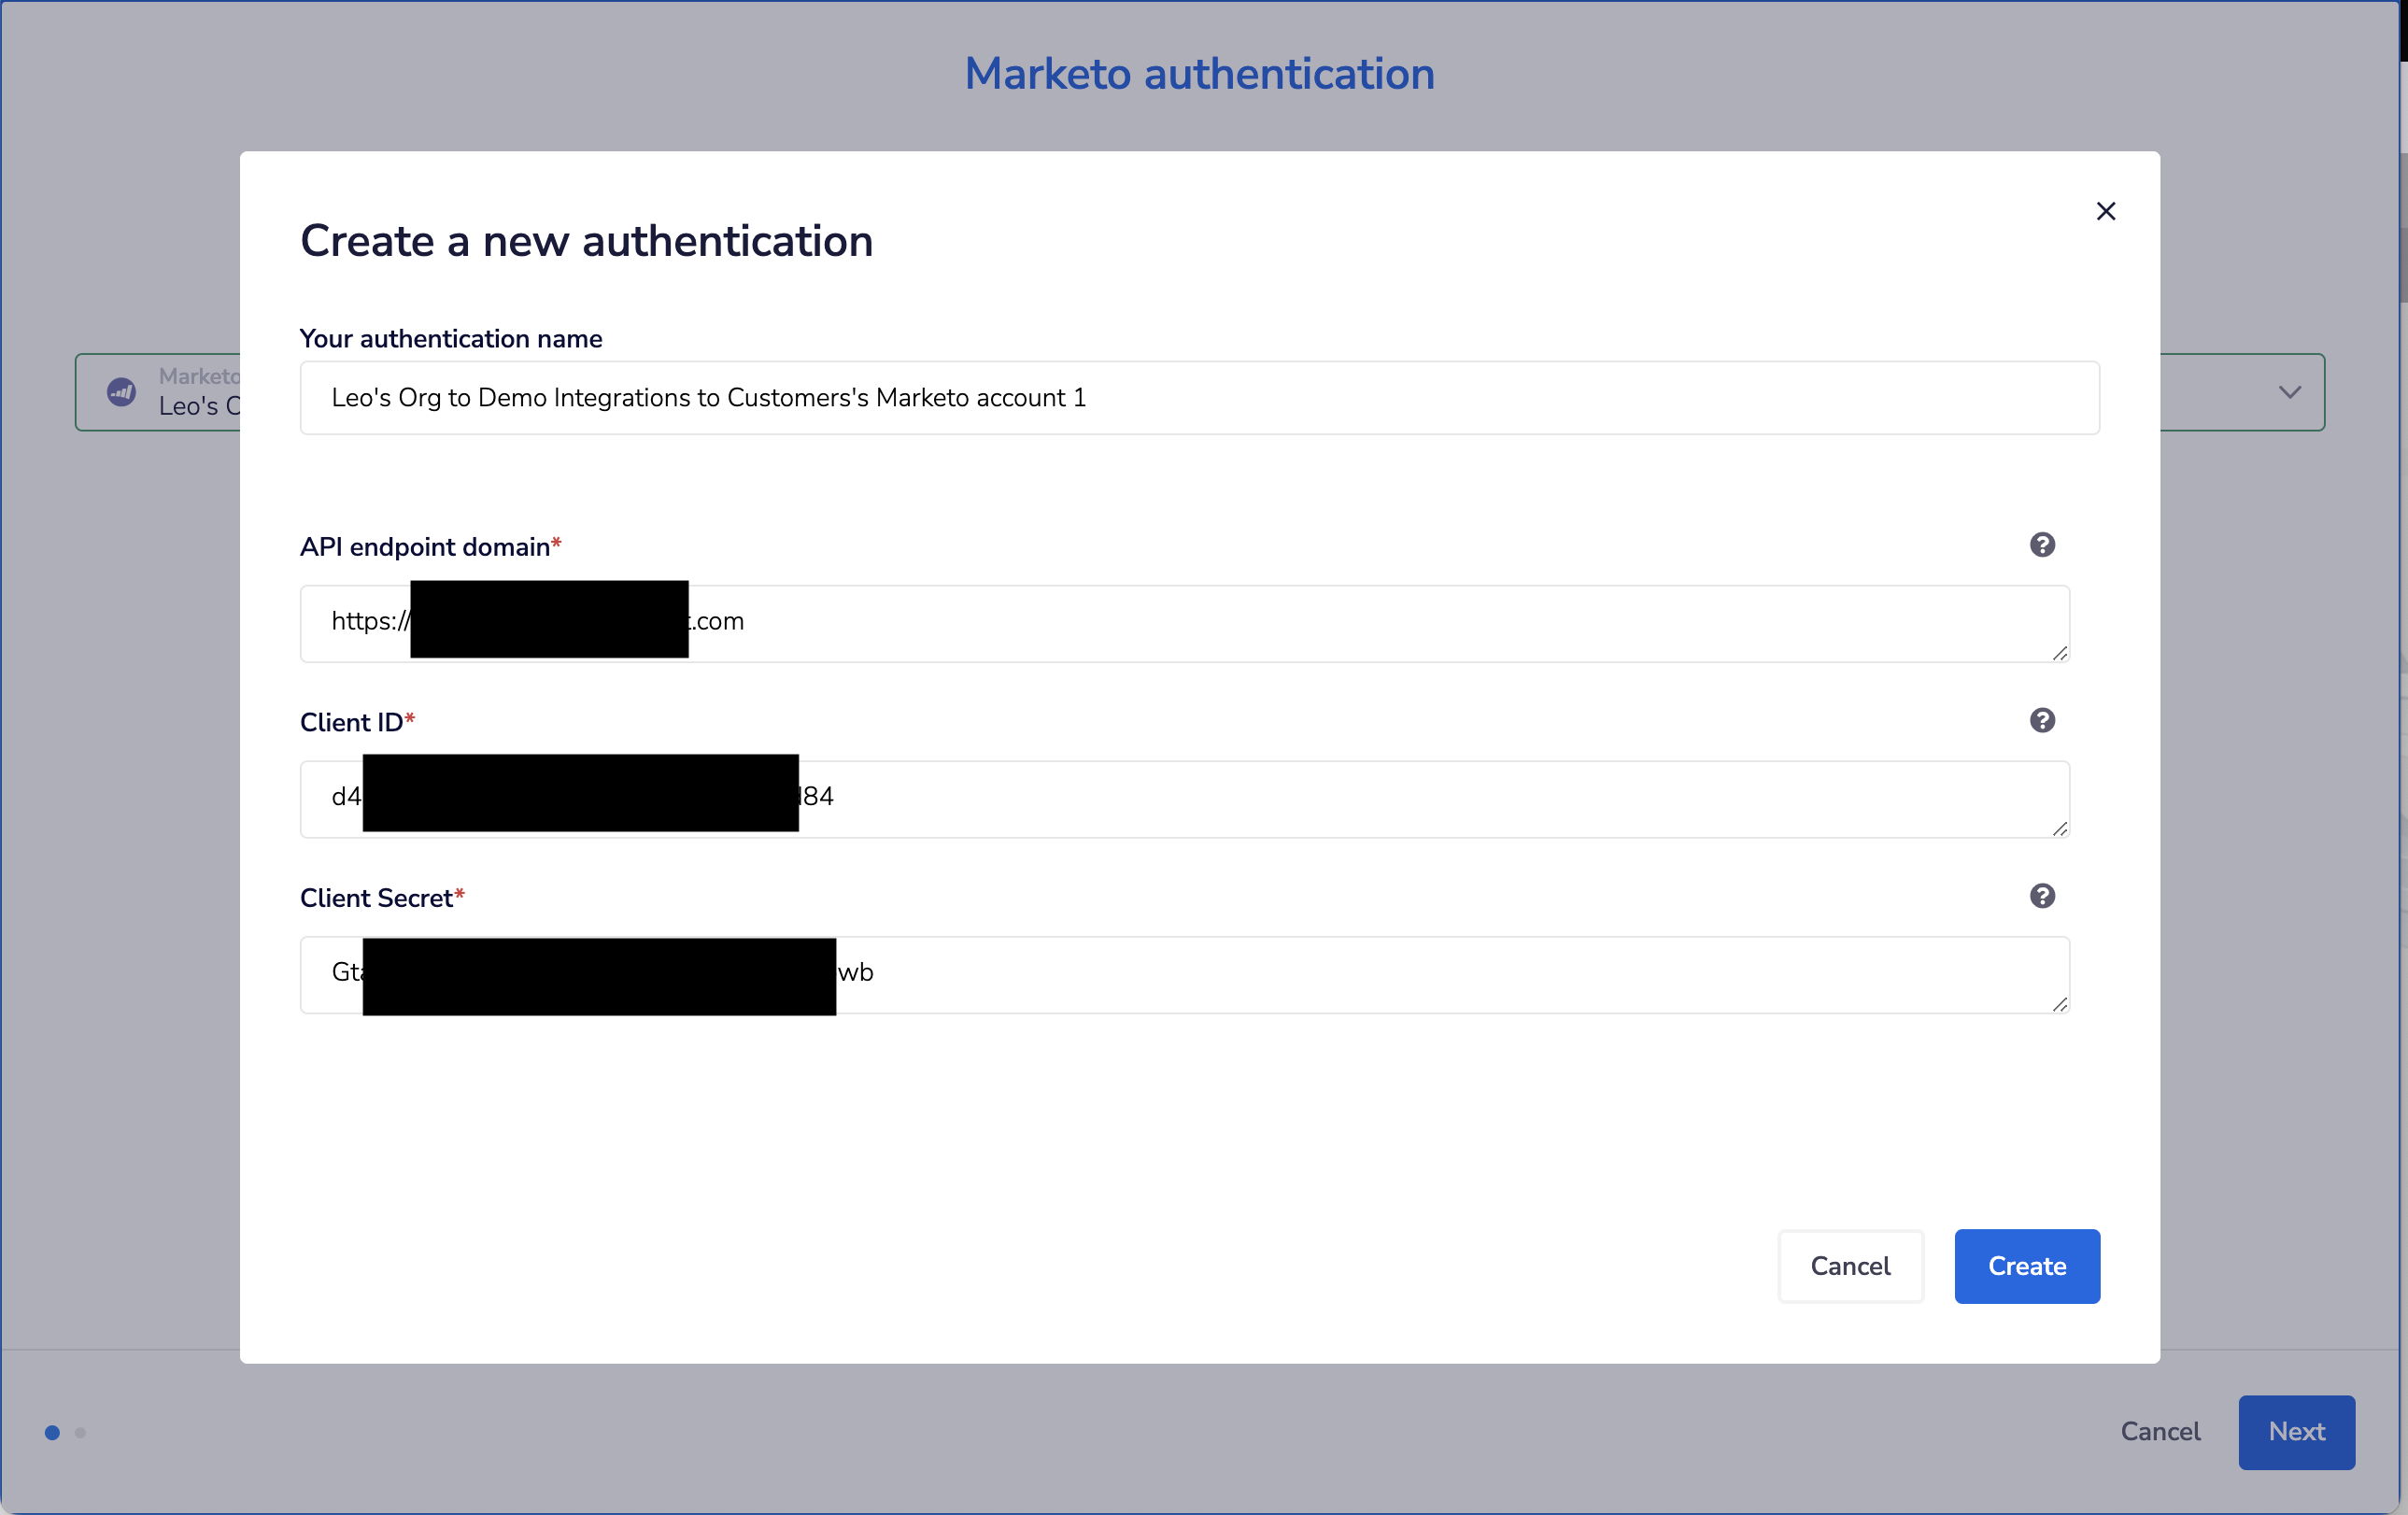
- Enter any name for your authentication.
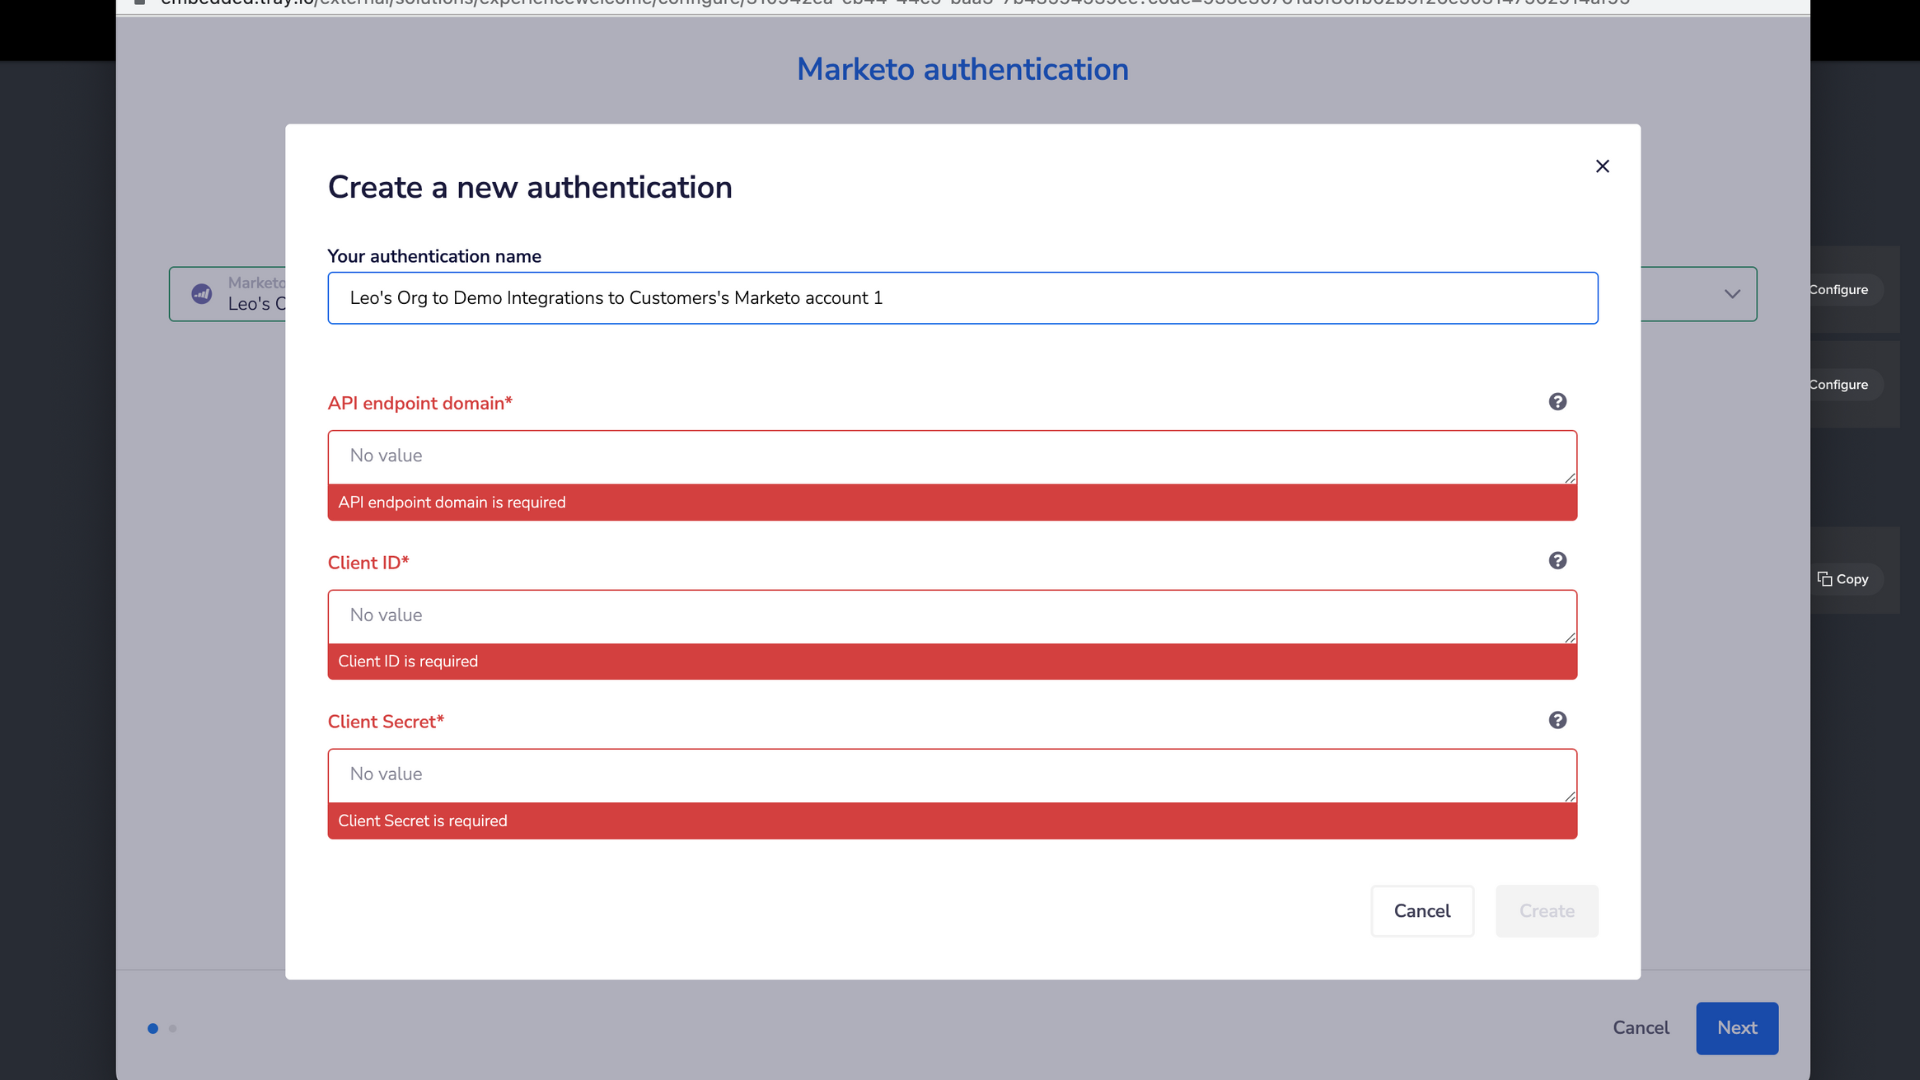
- In the API endpoint domain field, provide your Marketo REST API endpoint identified in the image below.
- This can be found by navigating to the Admin tab in Marketo
- Opening the "Integration" drop-down menu on the left-hand side
- clicking "Web Services". Be sure to delete the "/rest" from the end of the endpoint url when you paste it into Welcome.

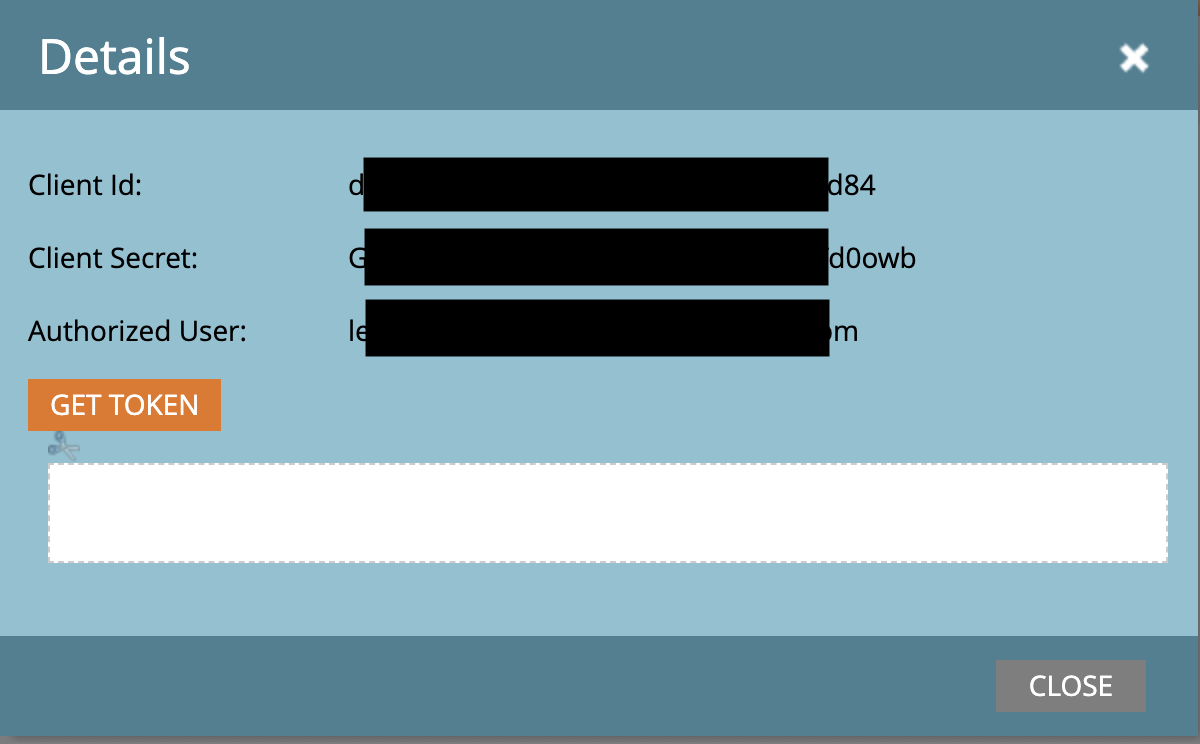
- Get the values for the Client ID and Client Secret Fields
- Open the Launchpoint dropdown menu in Marketo
- Create a new Launchpoint and call it "welcome"
- Select View Details on the Installed Service you have created

- You will see the Client ID and Client Secret fields
- When you have the right values pasted in, click Create
- Click Finish
- Map Welcome Fields to Marketo Fields..
- First, you must set a Marketo Template Program Id in the grey box pictured below.

- To get this ID, navigate in Marketo to the program you want to set as a template. This integration duplicates your template program for every Welcome event you create so that each Welcome Event is associated with a Marketo Program.
- A Marketo Program's ID can be found at the end of its URL, after the ME and before the A. See the portion of the URL in the red box below for an example

- After setting a Template Program Id, you need to map Welcome fields to Marketo Lead and Program Fields.
Editing Settings
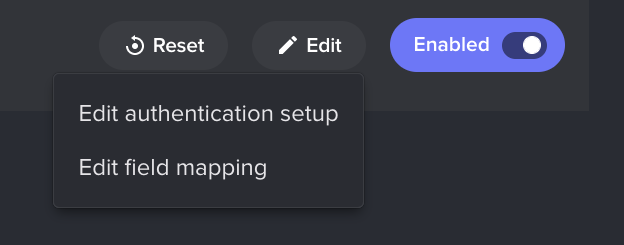
You can always update your Marketo Authentication or Field Mapping by clicking Edit and selecting which settings you want to update from the dropdown.
Resetting Connection
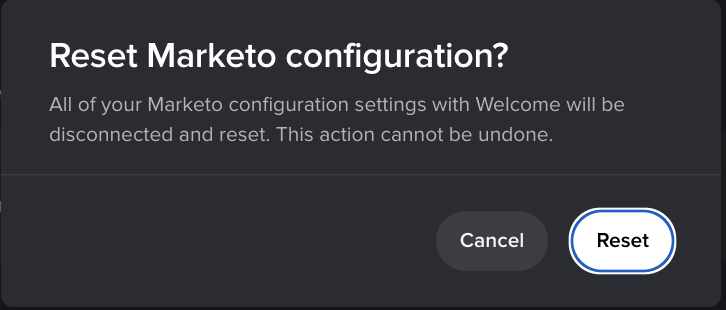
You can remove the connection to Marketo and your field mapping configuration by clicking Reset. This will not delete any data. You can always connect to Marketo and set a new field mapping configuration again.
Summary of data sent from Welcome to Marketo
Welcome Events -> Marketo Programs
This Integration Syncs Welcome Events and Welcome Event Registration interactions to Marketo.
After you configure this integration, whenever you create a Welcome event, a corresponding Marketo Program for the Event will be cloned from your template program and deposited into the same folder as the template.
By navigating to the Integrations tab for a specific Welcome Event, you can see the ID of the target Marketo program your Welcome Event is associated with.

You can update the ID of this target program if you want Welcome data to be sent to a different program you have set up. You can also turn off the "Sync from Welcome to external platforms" toggle if you don't want data from this event to be sent to Marketo.
Welcome Event Attendee Interactions -> Marketo Lead / Program Member Fields
See below for a summary table of what attendee interactions are sent and when. In the next section, you can see all the specific Welcome data points that can be mapped to Marketo Lead and Program Member Fields.
Event Registration Interaction
When is the interaction sent to Marketo
Attendee Registered for the Webinar
Real Time
Attendee Responded to a Poll
Real Time
Attendee Asked Question
Real Time
Attendee Clicked CTA on Stage
Real Time
Attendee Attended Webinar Live
Program member status is sent in real-time. Event Attendance Analytics are sent 90 mins after the event ends
Attendee Viewed Webinar On Demand
90 mins after the duration of the content they viewed*
* All Interactions except for "Attendee Viewed Webinar On Demand" are sent to Marketo per event registration interaction. "Attendee Viewed Webinar On Demand" will be a single update for all attendees.
You can view Welcome data in Marketo by navigating to the Marketo program associated with a Welcome Event and clicking the Members tab. Make sure that you add Welcome program member fields to the View you are using.

Setup – Mapping Welcome Fields to Marketo Fields
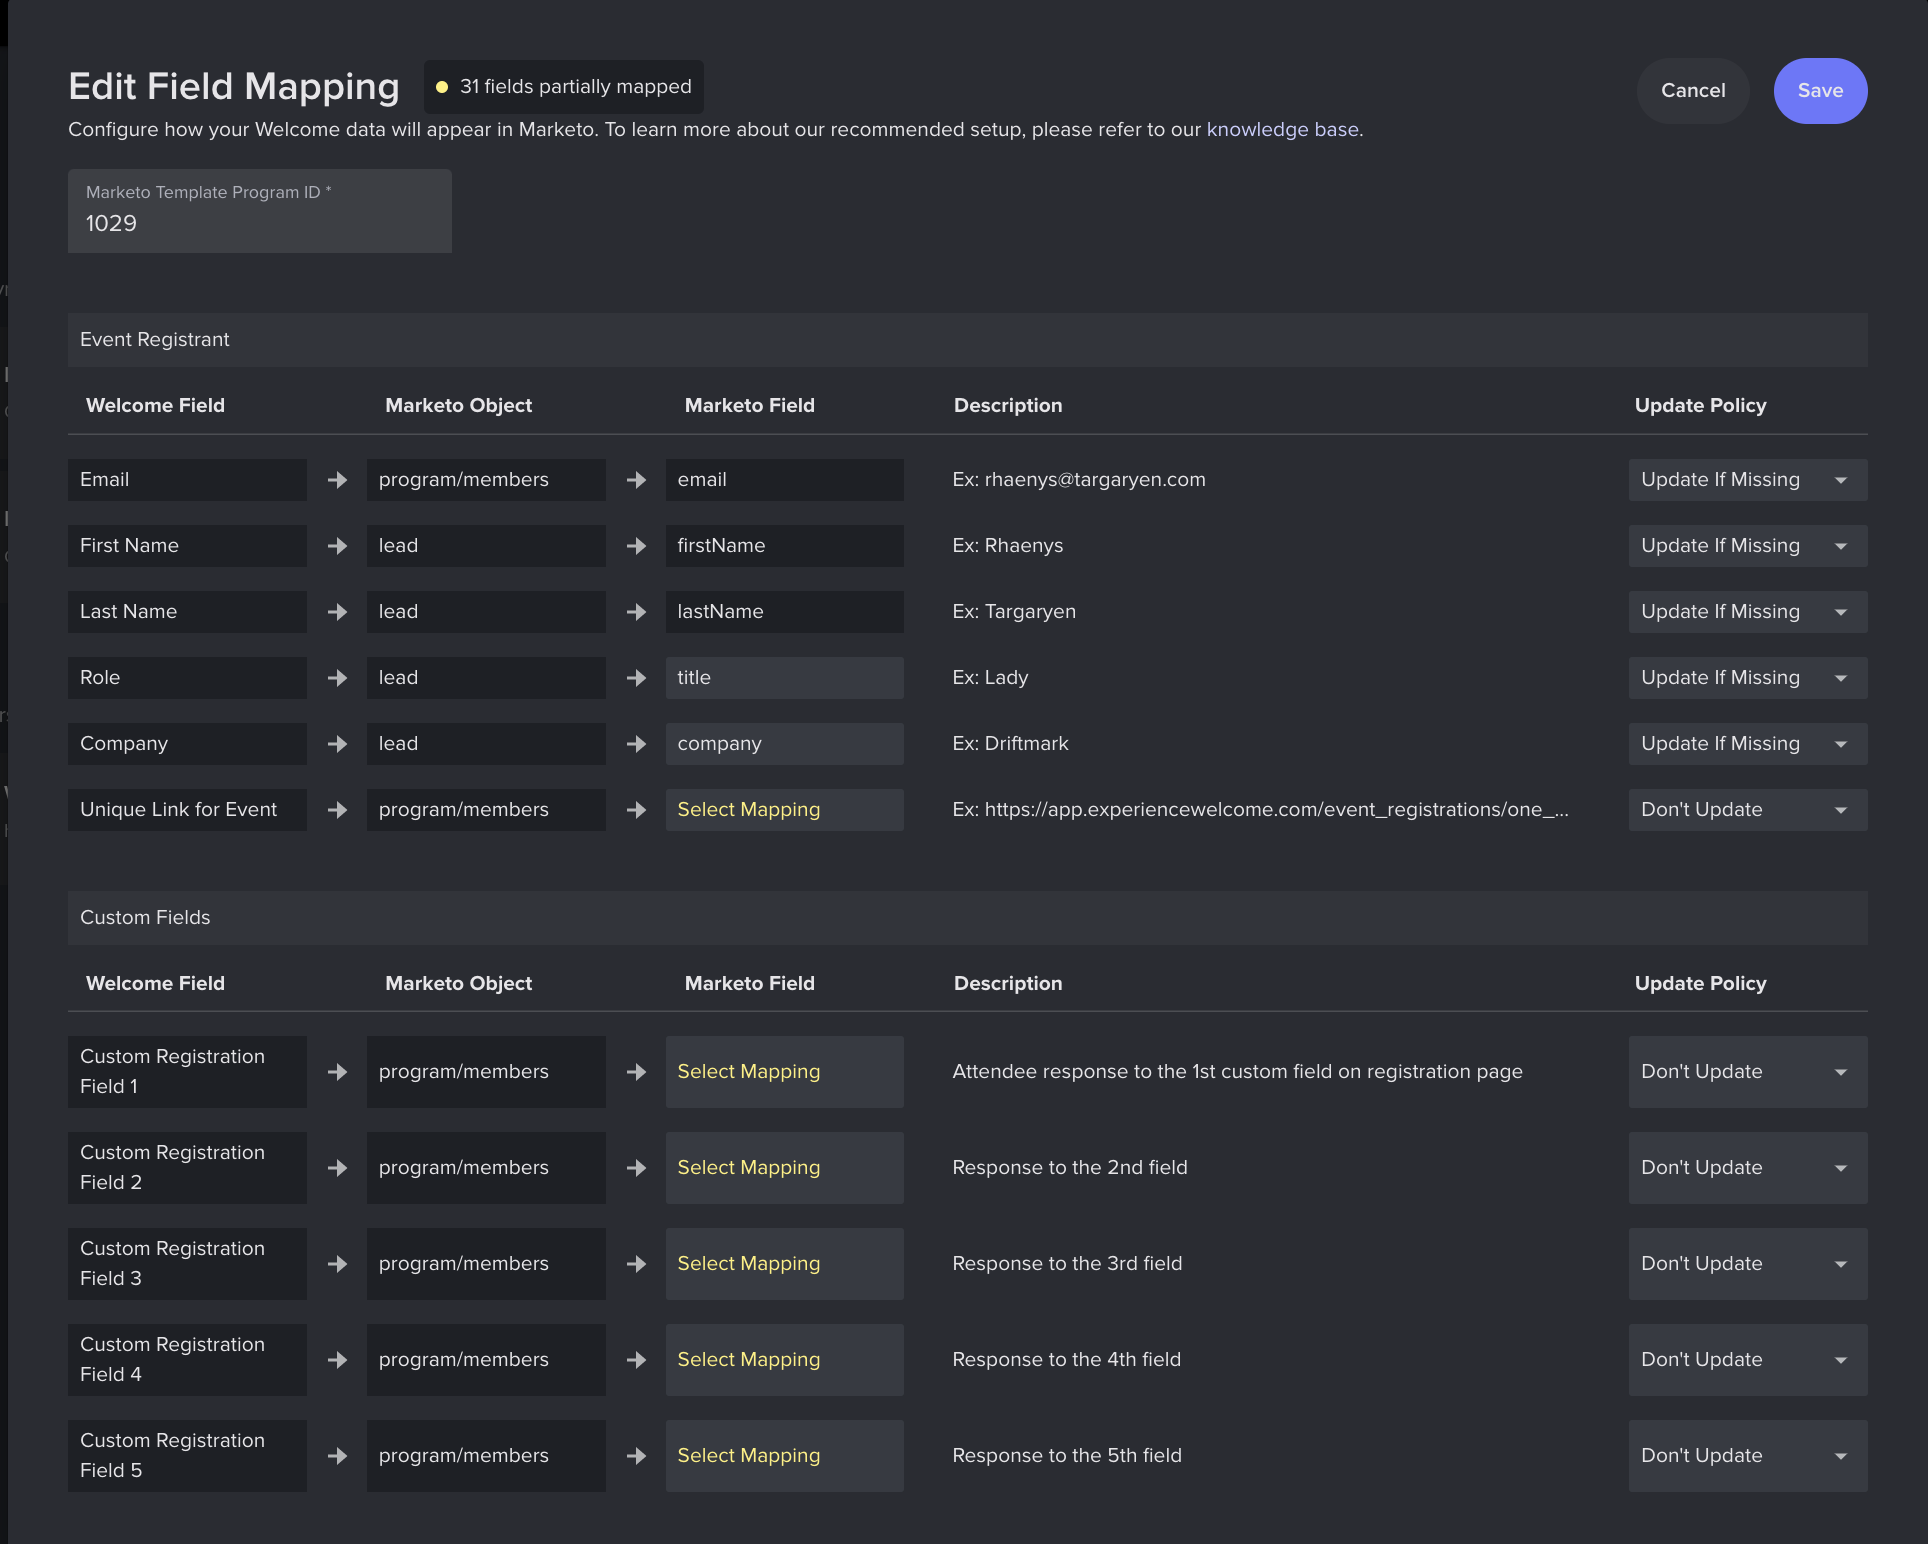
- First, make sure you set a Marketo Template Program ID. See step 5 in the previous section for more information on the Template Program Id.
- You can scroll down the Field Mapping dialog to view more fields to map. For instance, you can map the questions attendees ask to program member fields in Marketo.

- All Welcome fields that will map to Marketo Leads and Program Members are visible in the Field Mapping dialog. Data that is not mapped in this dialog will not be persisted to Marketo.
- Not all Field mappings are configurable by you. The destination of those mappings that you cannot update are in black boxes. The destination of those mappings that you can update are in grey boxes.
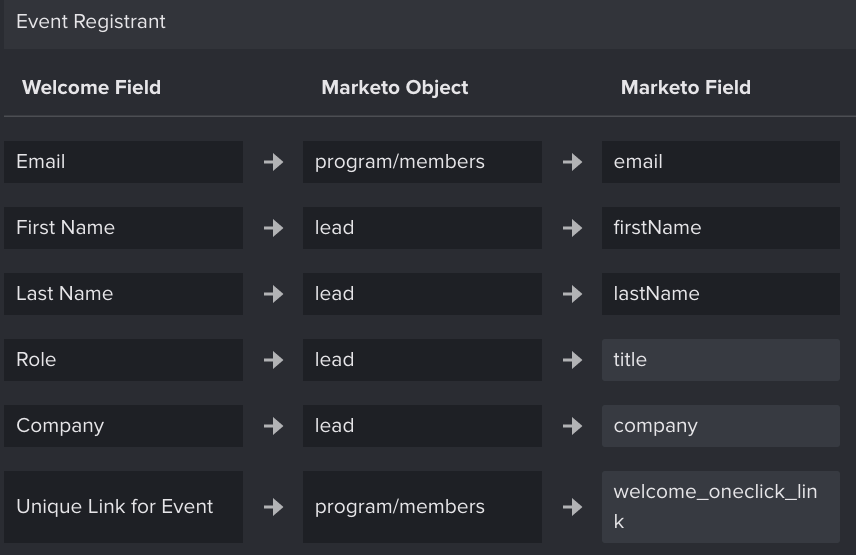
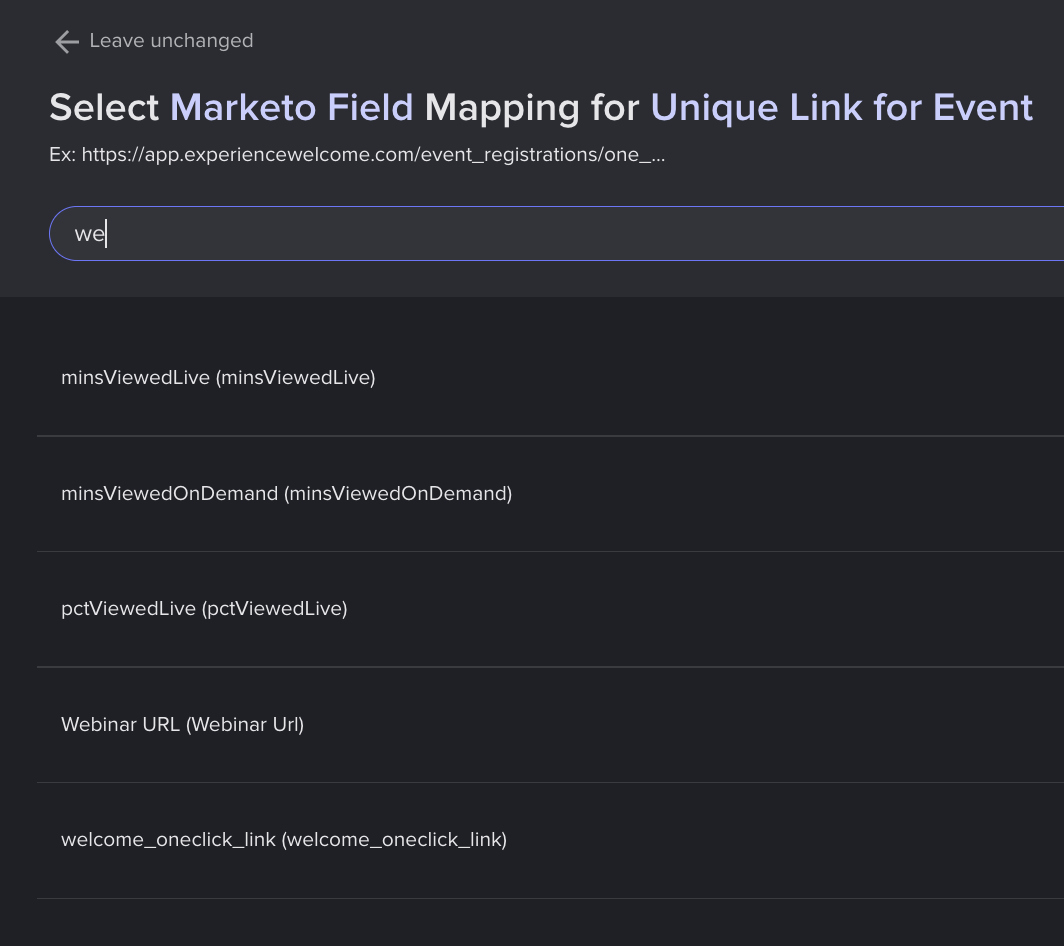
- When you click a mappable field to update you will be taken to a page to search for the field in Marketo that you can map to.
- If you need to create a new field in Marketo,
- Create the Field in Marketo First
- Then click “Select Mapping” in the Welcome Field Mapping Table
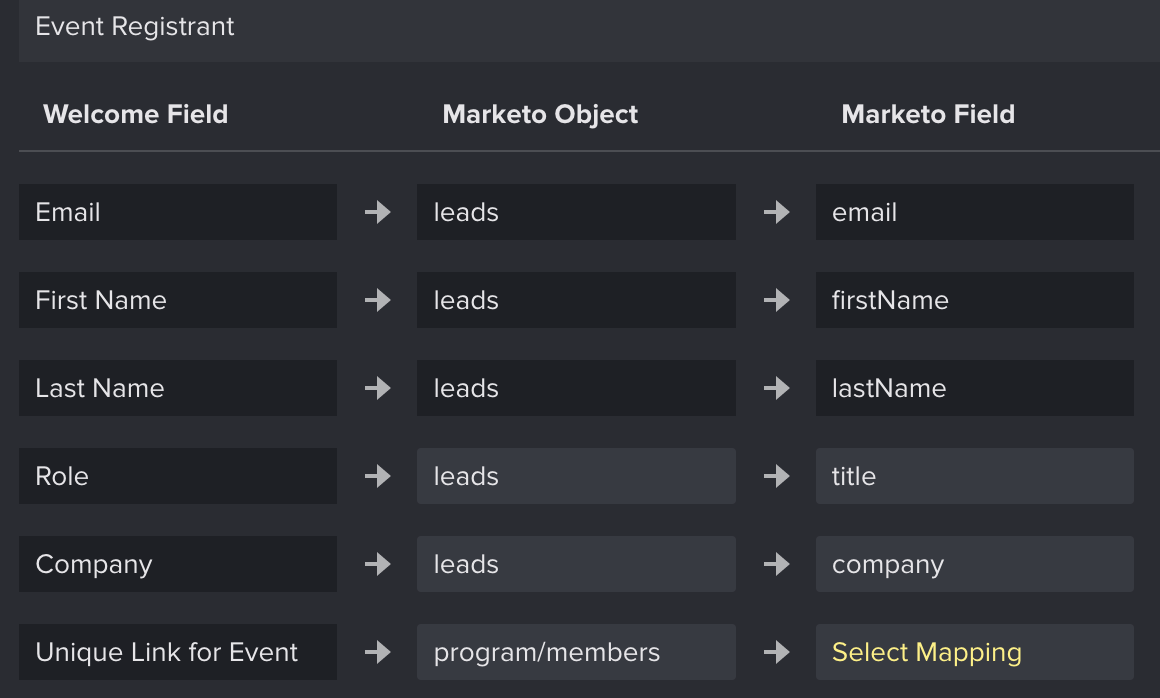
- You must also select the Update Policy for a field. You can choose from: “Overwrite”, “Update If Missing”, and “Don’t Update”. After setting a field, if you leave the update policy as "Don't Update" that data won't be sent to Marketo.

- Event Registrant Fields
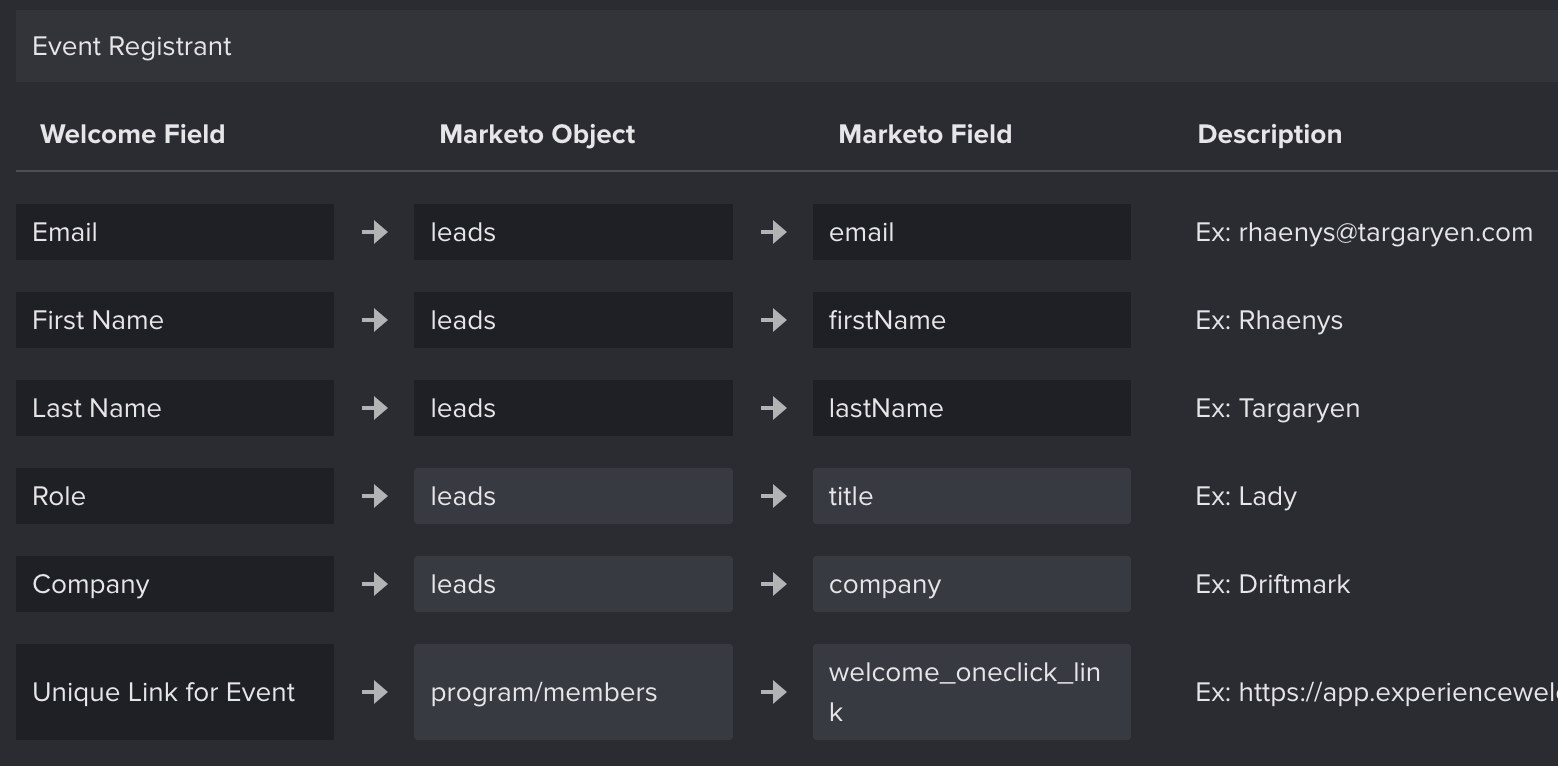
- The Event Registrant fields are populated in the target Marketo Program whenever someone new completes their registration on Welcome. (Registrations are completed when someone navigates through the Welcome Event Landing page, when they click their unique or quick registration link.)
- Email, First Name, Last Name are not mappable fields and will always be updated by the integration
- Role, Company, and Unique link are mappable fields. You can provide attendees their Unique Link in your pre-event communications from Marketo to allow them to bypass registration on Welcome.
- Custom Fields
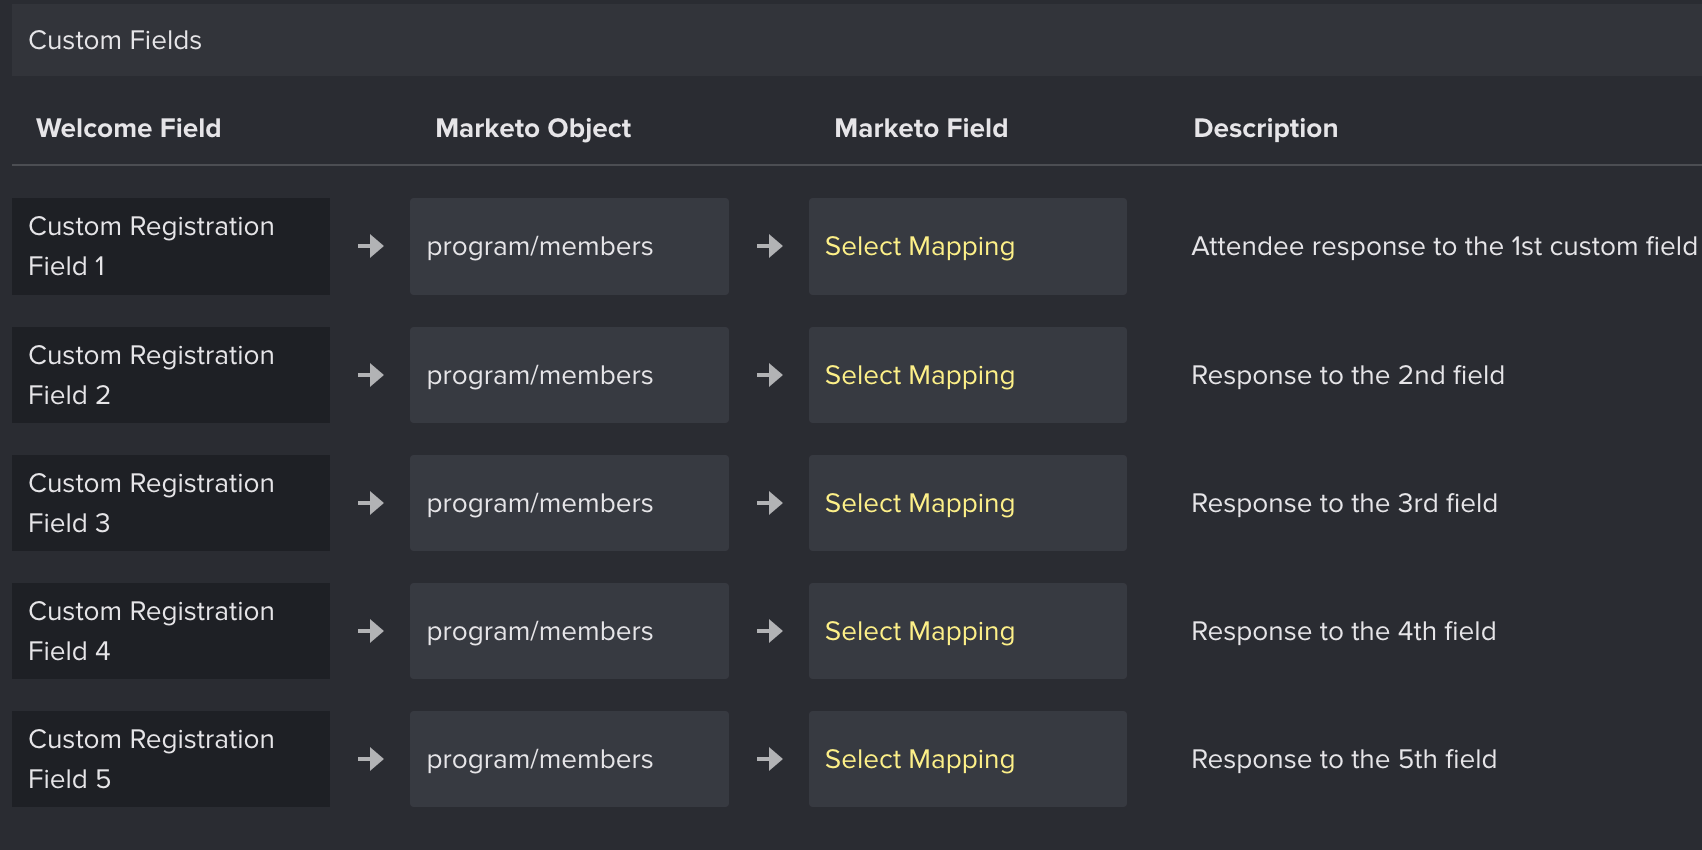
- Custom Registration Fields are populated in the target Marketo Program whenever someone new completes their registration on Welcome.
- You can map up to 5 attendee custom field inputs on an event registration page.
- For example, if the custom field is "City", the integration will sync the attendee's answer: "New York"
- The custom fields are mapped in order
- Mapping custom fields is optional.
- You should come back to the field mapping page to update the mapping configuration for different events which have different custom fields
- Event Registration Analytics
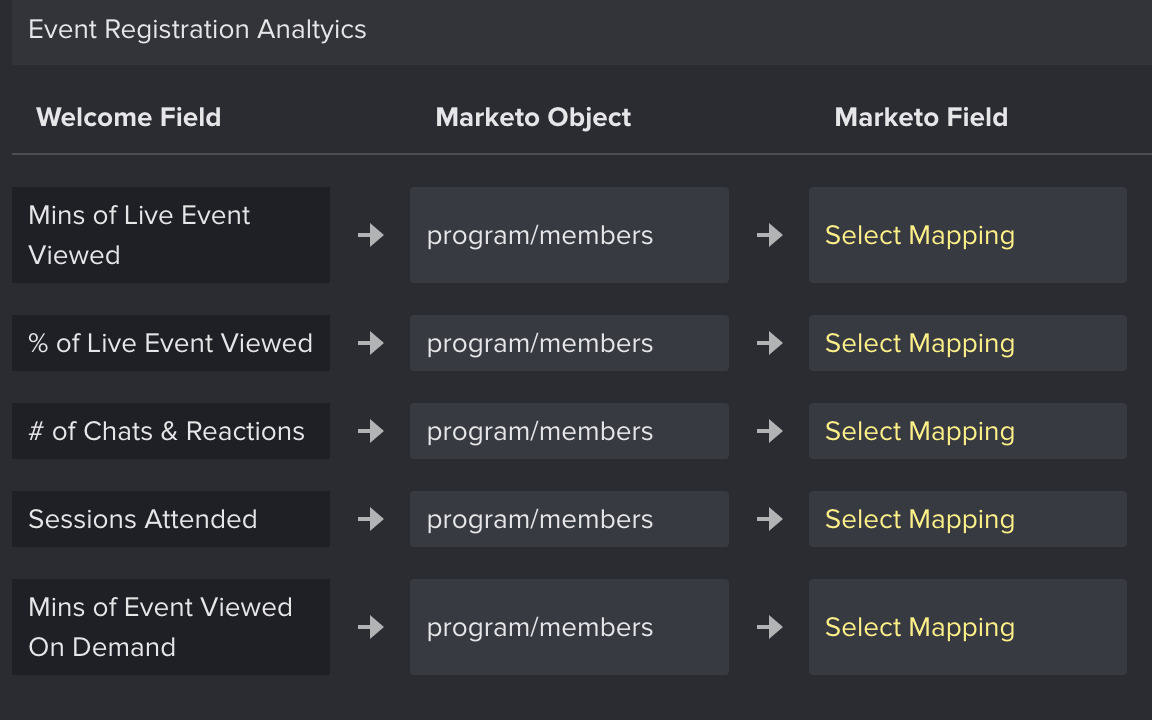
- Event Registration Analytics Fields are populated in the target Marketo Program 90 minutes after your event is over or 90 mins after someone views your event On Demand (to leave time for the system to properly aggregate all the data)
- These fields can be mapped to Custom Program Member Fields in your Target Marketo Program so you can act on attendee analytics data.
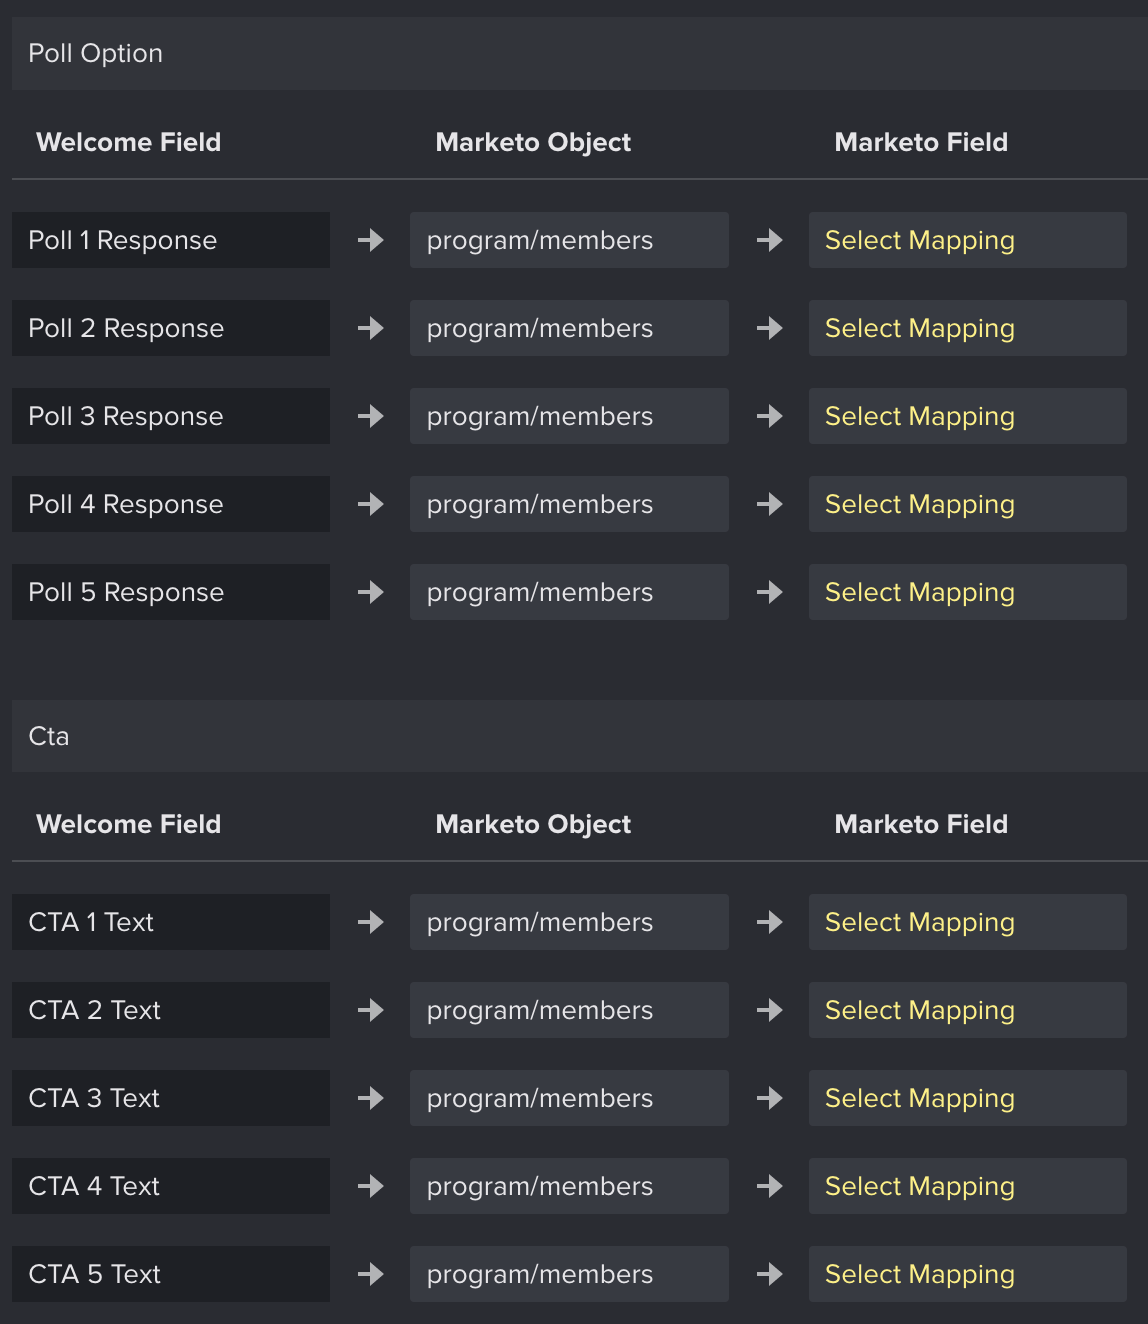
- Attendee interactions with on-stage CTAs, Attendees Questions in the Q&A tab, and Attendee Poll Responses are also mapped back to your Target Marketo Program. These interactions are sent to your target Marketo program in real time so you can take action on them.

How do I send registrants into Welcome from Marketo
To send Program Members into Welcome such that they don’t need to register again, we recommend using our Quick Registration link functionality.
Alternatively, you can create a Marketo Flow to send registrants into Welcome (after they sign up on a Marketo Registration form for instance), populate a Unique Link Property on each registrant’s Program Member Object, and use that property your pre-event communications. This more complex workflow is made obsolete by Welcome's Quick Registration Functionality linked above, but you may reach out to Welcome Support if you are looking to implement it.
Contact us
If you need any assistance or you have any questions regarding your Welcome <> Marketo integration, please email support@experiencewelcome.com


