
Sign up for The Drip
Join 5000+ marketers that receive The Drip newsletter covering the most relevant topics in B2B marketing.
Create and edit your Registration Form for your Webinar or Virtual Event
Navigate to the “Registration Options”>”Form” page.

From here you will be able to edit labels of User profile fields, along with adding “Custom fields” for additional data capturing.

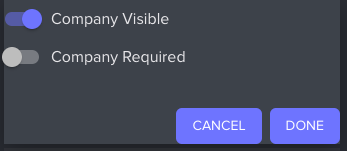
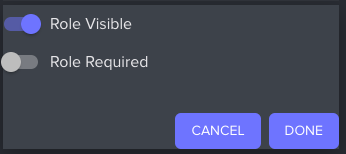
Standard fields, such as first name, last name, email, company, and role are always required.
Only the “company” and “role” fields can be edited to either a) be hidden/visible or b) required/non-required.
Any changes you make will be previewable on the right panel.
Select “Save and Publish” at the bottom of the screen when you are done.
Trending Posts
Welcome's Next Evolution: Webinars and Content at ScaleABM and Demand Generation: A match made in heaven?The Ultimate Guide on How to Integrate Organic and Paid Marketing Strategies
Stand Out By Staying In: 5 Ways To Use Brand Marketing Right Now
8 Creative Ways to Repurpose Your Webinar Content
Growth Marketing vs Demand Generation
How to Drive Qualified Pipeline and Enable Sales After Your Webinar Wraps
Loved and Trusted


