
Join 5000+ marketers that receive The Drip newsletter covering the most relevant topics in B2B marketing.
Troubleshooting Permission Issues
Permissions are probably the most common issue users have with Welcome. Permissions are both browser-based (camera and mic) and system-based (primarily for Macs), so depending on what and how you will be using Welcome you may need to confirm both are set correctly. Microphone and camera browser permissions will come up when trying to join the Green Room or Lounges and Breakouts. The other permission issue deals with screen sharing on a Mac.
Table of Contents
- Troubleshooting Camera and Microphone Permissions
- Approving Permission by Popup
- Approving Permissions via lock by URL bar
- Approving Permissions by Site Settings
- System Setting Permissions
- Mac System Settings
- Windows System Settings
Troubleshooting Camera and Microphone Permissions
This is a common view when joining a room that requires a camera and microphone but your permissions are blocking access to the devices.

This is an easy fix and we have 3 different ways of resolving this. This article is going to break it down step by step. This guide will be using Chrome as the browser since it is our recommended browser to use with Welcome.
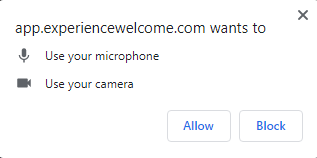
Approving Permission by Popup
By default, Chrome has Camera and Microphone permissions set to Ask. What this will do is cause a pop-up to appear at the top left of the screen just under the URL bar. Please do not ignore and close the pop-up, it is asking to approve permissions. Simply click Allow and then in Welcome the Camera and Microphone settings become available. In some cases, you may need to refresh the browser.
Approving Permissions via lock by URL bar
If the pop-up does not appear or if you closed the pop-up by accident. Have no fear we can still make changes to approve permissions by clicking the lock icon in the URL bar.
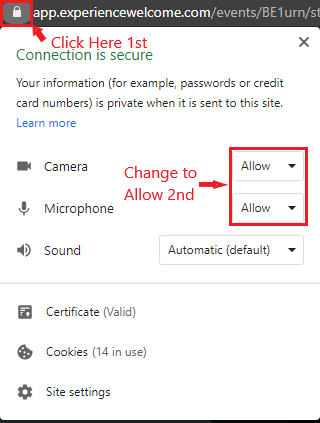
- On the URL Address Bar at the top, all the way to the left you should see a lock or padlock
- Click the lock and a pop-up will appear
- In the pop-up you should see permission drop downs for both camera and microphone
- Change settings to Allow
- Refresh browser
- Jump back into the event
Approving Permissions by Site Settings
If all of the above does not work or appear, the last thing we can do is go into Site Settings.
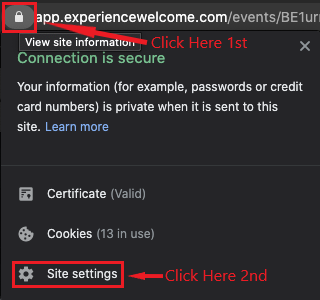
- On the URL Address Bar at the top, all the way to the left you should see a lock or padlock
- Click the lock and a pop up will appear
- In the pop up you should see Site Settings
- This should take you to a new tab and you should see permission drop downs for both camera and microphone
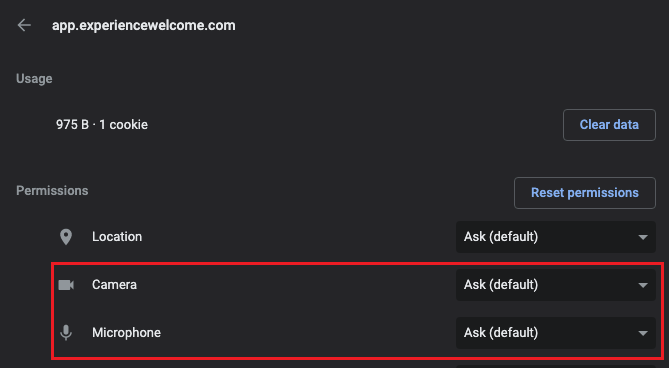
- Change settings to Allow
- Refresh browser
- Jump back into the event
System Setting Permissions
If you are going to be utilizing your camera/microphone and/or screen sharing on a Mac for the first time you might need to update these settings in your System Preferences. Without having these settings properly set, you will receive a permission error stating "Permission denied by system." Below is a quick walkthrough on how you can enable these permissions. Windows devices tend to have fewer of these situations but we also provide some steps for Windows devices.
An important thing to note is that some updates to your browser can cause your computer not to recognize permissions you have already set. In cases like these, please remove the permissions, re-add them, and then restart your browser.
Mac System Settings

- Go to Security and Privacy settings (Press CMD+ Space bar and type Security)
- Click the Privacy tab on the right
- On the left side bar scroll until you find and select Camera, Microphone, and/or Screen Recording
- Check the box for Google Chrome on the right for each section
- You will be prompted to restart Chrome if it is currently open
- Go back to the event and jump in
Windows System Settings
- Go to Privacy settings (Press Windows and type Privacy)
- On the left side bar scroll until you find and select Camera and/or Microphone
- Scroll down and check that "Allow Access to the Camera/Microphone on this device" is ON and toggles are enabled for Apps and Desktop Apps
- Go back to the event and jump in
Still need help?
If none of the solutions work above and you're still experiencing issues, feel free to contact support@experiencewelcome.com or click Help at the bottom right corner of the screen.
Trending Posts
Welcome's Next Evolution: Webinars and Content at ScaleABM and Demand Generation: A match made in heaven?The Ultimate Guide on How to Integrate Organic and Paid Marketing Strategies
Stand Out By Staying In: 5 Ways To Use Brand Marketing Right Now
8 Creative Ways to Repurpose Your Webinar Content
Growth Marketing vs Demand Generation
How to Drive Qualified Pipeline and Enable Sales After Your Webinar Wraps
Loved and Trusted


